The Tool Desk
Outbyte PC Repair FREERepair Windows errors before they cause bigger problemsFix Now →Outbyte Driver Updater FREEScan for outdated or missing drivers - takes under a minuteDriver Scan →
ThatPainter is reader-supported. When you buy through links on our site, we may earn an affiliate commission. Learn More
To make a panoramic pinhole camera, build a light-tight body around the film format you want, then set the pinhole-to-film distance and aperture for that geometry. Ross Orr’s Make: “Pin-o-rama” is a scratch-built 120-film design that exposes six wide 6×12 frames per roll. Its key dimensions are a 65 mm-radius curved film plane and a 0.33 mm pinhole. The result is a camera for deliberate, long exposures—not a quick snapshot device.
Choose the film format before you build
The film width and intended frame size determine the camera’s film path, gate and body proportions. Orr’s Make: project uses standard 120 roll film and produces six double-width panoramas per roll. This is a 6×12-style build, not a camera that accepts ordinary 6×6 frames without changing the design.
As an Amazon Associate I earn from qualifying purchases.
Free tools Windows power users keep installed
One-click scans. No signup required.
If you would rather assemble a kit or use 3D-printed parts, Dora Goodman’s SCURA is a different option: its listed formats are 35 mm panoramic with 60×25 mm negatives, or 120 in 6×6. It is not a drop-in 6×12 version of the Make: camera. Compare format and negative dimensions as well as how much construction you want to do. SCURA Pinhole Camera
Set the pinhole and curved film geometry
In the Pin-o-rama design, matching D-shaped plywood top and bottom pieces define the body. A 105° curved section with a 65 mm radius joins tangent flat sections. The project uses ½-inch plywood and places the film along the curved back. The curve helps keep the image surface at a more consistent distance from the pinhole across the wide frame; curved film can also make straight lines appear visibly bent.
#1 Best Overall

- Shoot 6x12cm Amazing Panoramic Images
- 90mm Optical Lens
- Panoramic viewfinder for image composition
- Two hotshoes for adding extra light
- Latest camera from Holga
For its 65 mm pinhole-to-film distance, the project specifies a 0.33 mm aperture, with a tolerance of ±20%, or about f/200. These are the dimensions of this particular design, not universal values: changing the film format or pinhole distance changes both exposure and image character. Check that the hole is round and its diameter is close to target; Orr suggests checking it with a scanner or projector. A clean, round hole matters more than simply making the opening as small as possible. Ross Orr’s Make: project
Build the camera body and shutter
Plan for a day or two for the original scratch build. The detailed project uses metal flashing for the film gate and shutter, a cardboard shutter chamber, spool hardware and a tripod mount. Black paint or tape helps suppress stray reflections and light leaks. Follow the project drawings for the shape and placement of the gate and shutter rather than improvising dimensions that determine film tracking or the focal distance. Build Your Pinhole Panorama Camera, Make: Magazine Volume 09
PC Slower Than It Used to Be?
A free scan shows the junk files, broken settings and background clutter dragging Windows down - then fixes them in one click.Free scan · Windows 10 & 11Outdated Drivers Are Slowing You Down
One free scan finds every outdated or missing driver and matches the right update for your exact hardware.Free scan · exact hardware matchRank #2
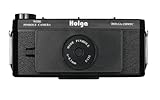
- This new version uniquely combines several methods of photography all in one neat package.
- It is a Wide-Angle Panorama camera, Pinhole camera and Medium Format Plastic camera all rolled in to one.
- Add to your Plastic Camera collection with this unique version of the Holga 120Ncamera
- Features built in cable release threaded shutter release button, bubble level.
- Cut the body pieces. Make matching D-shaped top and bottom panels and form the 65 mm-radius, 105° curved back with its tangent flats, following the project plan.
- Install the gate and film path. Fit the metal gate and spool hardware so the 120 film can travel across the image opening and advance without snagging.
- Make and fit the pinhole. Use a thin metal insert for the aperture, and check its roundness and approximate diameter before fixing it at the specified distance from the film.
- Install the shutter assembly. Build the cardboard shutter chamber and metal shutter as shown in the guide; check that the shutter opens and closes cleanly.
- Control light inside the body. Blacken or tape areas that could reflect light toward the film, then close the camera and inspect seams and the shutter for leaks before loading film.
- Add a stable mount. Fit the tripod mount so the camera can remain still during multi-second exposures.
Load and advance 120 film
Load the film away from direct sunlight or other strong ambient light. The backing paper protects the emulsion, but it does not make careless loading safe. Take the roll out of its light-protective pouch only when you are ready to load it, and thread it through the camera’s film path as shown in the project guide.
After each exposure, wind to the next odd frame number to avoid accidentally exposing the same section twice. The design’s guide says a roll yields six double-width panoramas. Once the roll is exposed, wind all of it onto the take-up spool, tape it closed, and open the camera in dim light. The Make: build guide
Rank #3

- Suitable for 35mm negatives and slides, either colors or B&W
- 22mm ultra wide lens capture wide views and put everything in the picture
- Easy switch between panoramic and standard ratio
- Lens cover to protect the lens from scratch when not in use
- Built-in flash for shooting indoor and dim environment
Expose the film without camera shake
Orr recommends ISO 100- or 200-speed negative film for this design. The project’s guide gives 2 seconds in sun and 10 seconds in bright shade as examples for 100-speed film. Treat those as starting examples from the guide, not guaranteed exposure times: actual exposure depends on the light, the film and its reciprocity behavior.
For an initial estimate at roughly f/200, the guide suggests taking a meter’s exposure time at f/16 and multiplying it by 150. Check the result against the conditions and adjust as needed. Faster film can make timing in bright sun difficult. Because even a short exposure is measured in seconds, use a tripod or another stable support and avoid touching the camera during the exposure.
Do these 3 things before closing this tab:
1Clear out junk files and repair common Windows errors2Scan for outdated or missing drivers - takes under a minute3Repair Windows errors before they cause bigger problemsRank #4
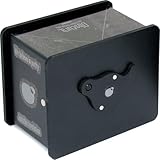
- Ilford Obscura Pinhole Camera "Only"
Arrange processing for the wide negative
A 6×12 negative is nonstandard for many processing and scanning workflows. Before shooting, confirm that the lab will process 120 film and return the negatives uncut; tell the lab that the roll contains wide panoramic frames. Scanning the uncut strip is one way to digitize the results, but check that the scanner or service can accommodate the negative width.
Independent reader supportYour contribution helps us test, update, and keep practical guides available for everyone.Is a photographic pinhole camera safe for looking at the Sun?
No: do not look directly at the Sun through or toward a photographic pinhole camera. A pinhole projection activity is different: NASA JPL’s instructions project an image onto a surface for viewing and warn that direct solar viewing requires equipment specifically designed for it. NASA JPL: How to Make a Pinhole Camera
Quick Recap
Best Value

- Easy Film Loading Process:The CAMEDAFLX 135SC reusable film camera features a straightforward film loading mechanism. It provides clear, step - by - step instructions on how to load the film, making it accessible even for beginners. The process includes opening the back cover, inserting the film canister, threading the film, and advancing it to the first frame with ease.
- Convenient Rewinding Function:Rewinding the film is made simple with the camera's user - friendly rewind mechanism. The manual clearly outlines the steps to rewind the film, ensuring that users can safely and efficiently return the film to the canister after use.
- Simple Shooting Instructions:The CAMEDAFLX 135SC 35mm film camera comes with easy - to - understand shooting instructions. It advises users on the best practices for taking photos, such as standing at least 1 metre from the subject and shooting in sunny or partly sunny weather. These guidelines help users achieve better results.
- Clear Battery Insertion Guidance:Inserting the battery is a breeze with the camera's clear instructions. The manual shows exactly how to open the battery door, insert the battery correctly, and ensure proper polarity. This simplicity ensures that the camera is ready for use quickly.
- Straightforward Built-in Flash Usage: The CAMEDAFLX 135SC reusable film camera's built-in flash usage is designed to be simple. It provides clear instructions on how to insert the battery for the flash, switch the flash on, and know when the flash is ready for use. This makes it easy for users to capture well - lit photos in low - light conditions.

Product prices and availability are accurate as of the date/time indicated and are subject to change. Any price and availability information displayed on Amazon at the time of purchase will apply.




