PC Slower Than It Used to Be?
The Tool Desk
Outbyte PC Repair FREERepair Windows errors before they cause bigger problemsFix Now →Outbyte Driver Updater FREEFix the driver behind crashes, sound loss and screen glitchesFind Drivers →Outbyte PC Repair · freeA free scan shows the junk files, broken settings and background clutter dragging Windows down - then fixes them in one click.
Run a Free PC Scan →ThatPainter is reader-supported. When you buy through links on our site, we may earn an affiliate commission. Learn More
You can make a simple origami Christmas tree from one 6 x 6-inch (15 x 15 cm) square of paper in about five minutes. The easiest beginner design is a flat, green tree made with a few diagonal and center folds; it needs no glue, scissors, or special tools. Follow the traditional single-sheet method below, then use the decorating and display ideas to turn one tree into a paper forest.
Design note: Several different origami Christmas-tree models are described online. The main instructions below are an original, orientation-focused explanation of the traditional beginner model documented by Origami.me. That page attributes the diagramming to Jimena Candia and labels the model traditional/unknown; these instructions do not reproduce its diagrams or wording.

As an Amazon Associate I earn from qualifying purchases.
Do these 3 things before closing this tab:
1Clear out junk files and repair common Windows errors2Fix the driver behind crashes, sound loss and screen glitches3Repair Windows errors before they cause bigger problemsMaterials
- One 6 x 6-inch (15 x 15 cm) square of lightweight kami origami paper. Green is the most traditional choice. A 6-inch green origami paper pack is a practical option for making several trees.
- A flat surface for folding.
- Optional: a small paper star, tiny paper circles, a hole punch, patterned paper, or metallic paper for decoration.
Kami is thin, inexpensive, and designed to take clean creases. It is often colored on one side and white on the other, which gives the finished tree a green-and-white two-tone appearance. Avoid thick construction paper for this first attempt: heavy stock is harder to fold accurately and may split at repeated creases. The Origami.me paper guide also notes that paper sold as “origami paper” can vary in thickness, squareness, and crease-holding ability.
How to fold the single-sheet origami Christmas tree
Use a firm fingertip or the side of a fingernail to sharpen each crease, but do not press so hard that the paper becomes scored or torn. The terms “top,” “bottom,” “left,” and “right” refer to the model’s position as you work through each step.
#1 Best Overall
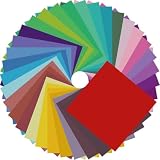
- Premium Craft Paper: Thick wood pulp origami sheets hold crisp clean creases without tearing or splitting during repeated folding; neatly cut square edges and rich assorted solid colors simplify folding cranes, flowers and modular origami, solving the common trouble of thin flimsy paper failing detailed handmade crafts
- Classroom Art Essentials: Designed for preschool and elementary art lessons, math geometry teaching and after-school handcraft activities; teachers utilize these folding papers to demonstrate shape symmetry and spatial concepts, ideal bulk art supply for back-to-school classroom inventory
- Home Family DIY Choice: Create enjoyable indoor parent-child bonding on weekends and holidays; folding paper planes, jumping frogs and paper boxes improves children’s fine motor skills and concentration, helping kids cut down unnecessary screen time at home
- Holiday DIY Decoration Material: Perfect for handmade greeting cards, birthday ornaments, party embellishments and scrapbooking accents; fold custom paper blooms and gift tags for Christmas, Easter and all seasonal handmade decorations and small craft favors
- Universal Craft Gift Option: Suitable for beginner folders, hobby crafters and origami lovers of from young kids to adult artisans; compact bulk packaging makes it a thoughtful birthday and holiday craft gift for art enthusiasts of your family and friends
- Place the square with its colored side down. If your paper has a green side and a white side, begin with the green side against the table so the intended color will show on the outside of the finished tree. If you prefer the reverse color arrangement, begin with the colored side up.
- Make the main diagonal crease. Bring one corner to the opposite corner, align the edges carefully, and crease the diagonal. Unfold the paper completely. You should now have one clear diagonal reference crease.
- Rotate the paper about 45 degrees clockwise. The crease and corners should now be oriented like a diamond rather than a square. Exact angle is less important than positioning the paper so the next two edges can be brought toward the center line.
- Make the kite-like base. Bring the upper-left edge toward the center line, using the diagonal crease as your guide. Crease it. Repeat with the upper-right edge. The folded shape should resemble a narrow kite, with the two upper sides meeting near the center.
- Fold the model in half. Bring the bottom corner up to meet the top corner and crease the entire model in half. Keep the edges aligned before sharpening the fold.
- Fold the upper side edges inward. Take the upper side edge on one side and fold it toward the center line. Repeat on the other side. These folds refine the tree’s tapered shape, so check that the two sides are as symmetrical as possible.
- Fold the top corner downward. Use the existing shape and the reference line shown by the previous folds to position the top corner. Fold it down neatly and crease it. This creates the upper tip and helps define the tree silhouette.
- Fold the bottom corner upward. Lift the bottom corner until it meets the lower edge of the green triangular section. Align the point with that edge rather than guessing from the outer paper boundary, then crease the fold firmly.
- Turn the model over. Flip the paper to reveal the completed origami Christmas tree. The lower portion gives the design the appearance of a small tree in a planter or trunk base.
What the finished tree should look like
The result is a small, mostly flat Christmas-tree shape with a pointed top, tapered sides, and a lower base. One side may show the paper’s white reverse, depending on the paper and how you began. That is not necessarily a mistake: green-and-white contrast can look like snow or a deliberate two-color design.
If the tree is visibly lopsided, do not force the final shape into place. Reopen the most recent side fold, align both edges with the center crease, and sharpen the fold again. Small alignment errors become more noticeable near the pointed top, so accuracy at the early center folds matters more than pressing every crease extremely hard.
Quick wins for a faster PC:
Repair Windows errors before they cause bigger problemsFix Now →Scan for outdated or missing drivers - takes under a minuteDriver Scan →Rank #2

- [ 25 VIBRANT COLORS ] Our origami papers comes in 25 colors, 12 sheets of each color, The 300 sheets vibrant double-sided paper ( both sides of the paper are the same color ) adds dimension to your creations, whether you're folding stars, cranes, or flowers. Ideal for both beginners and seasoned crafters, this origami paper kit provides everything
- [ PERFECT SIZE ] Each sheet of origami paper measures 6x6 inches (15x15 cm), providing a perfect square for creating every origami design. This perfect size offers precision and versatility for your every origami. From simple geometric patterns to complex animals and plants, origami paper 6x6 can do it all
- [ PREMIUM QUALITY ] Our oragami paper is crafted from high-quality 70gsm papers, ensuring a smooth texture that’s easy to fold and shape. Thin enough for precise creases yet durable enough to hold its form, It’s also easy to cut, making it perfect for paper crafts and DIY projects. Make it easy to enjoy your origami time
- [ INSPIRES CREATIVITY ] This origami kit for kids ages 8-12, kids ages 5-8, and beginners is a fun and imaginative activity that sparks creativity and encourages learning. Our origami papers enhances hand-eye coordination, spatial awareness, and problem-solving skills while offering a relaxing escape stay away from electronic products
- [ A GREAT GIFT ] Our origami papers are perfect for a variety of art projects, including origami, scrapbook,crafts, and party decorations. Origami paper 6x6 are ideal to be used for art classes, family activities, or as a creative project. Also, this origami paper kit is the perfect gift for craft lovers of all ages.Ideal for holidays like Easter, Children’s Day, Thanksgiving, Halloween, and Christmas
Decorating ideas that will not weigh the tree down
- Add a tiny star: Fold or cut a small paper star and place it at the top. Keep it light so the tip does not bend.
- Use paper ornaments: Add a few tiny punched dots or hand-cut circles. A small number looks cleaner and keeps the structure flat.
- Try patterned or metallic paper: Use it for accent trees, stars, or a second layer rather than covering the entire tree with heavy embellishments.
- Make a miniature forest: Fold trees from green, white, gold, silver, and patterned sheets. Vary the paper colors and arrange the trees in groups.
- Create a base: Place the tree on a small paper pot or rectangular stand if you want a more finished display. The basic model already suggests a planter-shaped lower section.
For multiple trees, an assorted 6-inch origami paper pack is useful for practice, classroom projects, or a forest with different colors. Use lightweight decorations rather than beads, large buttons, or anything that could pull the folded layers open.
Troubleshooting
| Problem | Likely cause | Fix |
|---|---|---|
| The tree looks uneven. | The side folds were not aligned to the center crease. | Open the last fold, match the edge to the center line, and crease again. Compare both sides before continuing. |
| The paper tears. | The paper is too thick, the crease is being forced, or the same fold has been reopened too many times. | Switch to thin kami, make fewer repeated corrections, and use moderate pressure. Thick paper is especially troublesome for more elaborate accordion folds. |
| The tree will not stand. | The single-sheet model is primarily a flat tree, or the lower section is not holding its shape. | Sharpen the lower fold, place it against a slightly heavier paper base, or choose a layered design with a separate trunk for a freestanding display. |
| The white reverse is distracting. | Standard kami is often colored on only one side. | Use double-sided or colored-through paper, or treat the white as intentional snow detail. Patterned paper can also make the contrast part of the design. |
| The model is too small to handle. | A small sheet makes alignment more demanding, especially for children or first attempts. | Practice with a larger square first. Once the sequence is familiar, repeat it with the recommended 6-inch sheet. |
Three ways to expand the project
1. Try an alternative easy fir tree
If the orientation of the traditional model feels confusing, try the different one-sheet fir-tree variation from Origami Guide. Its sequence starts with a central vertical crease, then folds the lower-right diagonal edge toward the center and repeats the fold on the left. The sheet is then rotated so the wider end is at the bottom. It is also described as an easy model and works well when you want to make a decorative forest. It is a separate design, not a continuation of the numbered method above.
2. Make a taller accordion-fold tree
For a more sculptural tree, the Paper Kawaii tutorial uses a rectangular sheet such as A4 or US Letter paper and relies on accordion folding. It can be displayed in a pot and topped with a star, but it is more fiddly than the basic single-sheet model. Use thin but strong paper, and expect to spend more time aligning repeated folds. The tutorial is available through Paper Kawaii’s video. Thick paper is particularly likely to resist the folds or rip in this version.
3. Build a layered tabletop tree
For a three-dimensional, no-glue display tree, Jo Nakashima’s variation uses several square sheets in decreasing sizes: 20 cm, 15 cm, 10 cm, and 7 cm for the green layers, plus brown paper for the base. It is a better choice when you want a taller tabletop object rather than a flat ornament. See the Jo Nakashima video for that separate construction. Because it uses multiple sheets and layers, it is not the one-paper beginner project described in the main instructions.
Free tools Windows power users keep installed
One-click scans. No signup required.
Choosing paper for the result you want
| Goal | Paper choice | What to expect |
|---|---|---|
| Fastest beginner practice | 6 x 6-inch lightweight kami | Easy creasing, low cost, and a manageable finished size. |
| Classic evergreen | Green kami | A simple traditional tree, often with a white reverse visible on some folds. |
| Paper forest | Assorted 6-inch kami | Multiple colors for groups of trees, practice sheets, or classroom projects. |
| More decorative finish | Double-sided or patterned paper | Less distracting white reverse and more visual interest, though patterns may make creases harder to see. |
| Tall sculptural version | Thin, strong rectangular paper | Suitable for the accordion-fold design, but more demanding than the basic model. |
Optional resources for more holiday models
You do not need a book or kit to make the tree in this tutorial. If you want a larger seasonal project, the National Trust: Christmas Origami book is described by its publisher as including instructions for 13 festive pieces and 50 patterned paper sheets. Origami Christmas Treats from Oriland is described as containing 19 original designs and nearly 200 step-by-step diagrams. Check the current edition, availability, price, and shipping region before buying; those details can change.
For a painting or mixed-media display, mount several finished trees on heavyweight watercolor paper, add a wash of pale blue or warm gray behind them, and leave the folds unpainted so their shadows remain visible. If you do add paint, use a light application: saturated wet paint can soften kami and flatten the creases.
Rank #4

- 【Size】: Each sheet of origami paper measures 6x6 inches (15x15 cm), providing a perfect square for creating beautiful origami designs. The ideal size for both beginners and experts, these paper offer enough space to showcase intricate details and folds.
- 【20 Colors】: Our origami paper comes in a pack of 20 bright colors, allowing for a wide range of creative possibilities. Each sheet is double-sided, that add depth and dimension to your creations. Whether you prefer bright and bold hues or soft and subtle shades, our colored paper is sure to inspire your imagination.
- 【Quantity】: With 200 sheets per pack, you'll have plenty of origami paper to work with. Whether you're creating small scale designs or larger, more complex pieces, this pack provides you with an ample supply of premium paper.
- 【Great fun】: Made from premium paper, our origami papers are durable and easy to work with. The papers are thin enough to fold easily, yet sturdy enough to hold shape. They are also easy to cut, making it perfect for a wide range of craft projects.
- 【Versatile】: Our origami papers are perfect for a variety of art projects, including origami, crafts, and party decorations. They are ideal to be used for art classes, family activities, or as a creative project. With our origami tutorial videos, you can learn new techniques and get inspired to create unique designs that showcase your artistic talents.
Copyright and attribution
Origami diagrams and named designers’ instructions are creative works. Use the linked tutorials for reference, but do not copy their diagrams, screenshots, or full written directions into another project. The alternative models above are identified by their respective sources so readers can follow the original demonstrations and distinguish them from this article’s original explanation.
Frequently Asked Questions
How much paper do I need to make an origami Christmas tree?
The beginner model needs one square sheet, with 6 x 6 inches (15 x 15 cm) being the recommended starting size. Lightweight kami is easier to crease than thick construction paper.
Recommended Free Tools
Best Value
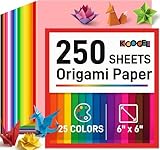
- Ease of Folding - Our origami paper is exceptionally easy to fold and holds creases securely. In addition to origami, used for crafting simple paper cutouts, such as delicate flowers
- Durable Design - These origami sheets are highly resilient and won't easily tear or break, even after numerous folds
- A Wide Range of Colors - This set is divided into 25 vibrant colors, with each color containing 10 sheets. These double-sided sheets measure 6 x 6 inches, ideal choice for crafting traditional origami shapes
- DIY Supplies - Suitable for both kids and adults who enjoy arts and crafts projects, this origami paper set can foster creativity and stimulate brain growth in children, according to scientific studies
- Child-friendly - Our square paper comes in vibrant colors, good for kids' color recognition training, small size, suitable for small hands to grip, no extra additives, 100% child-safe.
Can I make an origami Christmas tree without glue?
Yes. The basic single-sheet tree requires no glue or scissors. A separate layered tabletop design also uses no glue but requires several square sheets in decreasing sizes and a brown-paper base.
Why is my origami tree flat instead of standing?
The traditional one-sheet model is mainly a flat tree shape. Sharpen the lower fold and support it with a paper base, or use a layered multi-sheet design if you need a freestanding tabletop tree.
What is the best paper color for an origami Christmas tree?
Green is the classic choice, but white, metallic, patterned, double-sided, and assorted colors work well for decorative trees or a miniature forest.
The Bottom Line
For the quickest reliable result, use one 6 x 6-inch sheet of lightweight green kami, follow the nine folding steps, and keep decorations small. Once the basic tree is familiar, switch to assorted paper for a forest or try the accordion-fold and layered designs for a taller display.
Quick Recap

Product prices and availability are accurate as of the date/time indicated and are subject to change. Any price and availability information displayed on Amazon at the time of purchase will apply.




