Quick wins for a faster PC:
Fix the driver behind crashes, sound loss and screen glitchesFind Drivers →Repair Windows errors before they cause bigger problemsFix Now →Scan for outdated or missing drivers - takes under a minuteDriver Scan →
ThatPainter is reader-supported. When you buy through links on our site, we may earn an affiliate commission. Learn More
To make handmade paper in a custom color, turn scrap paper into pulp, tint a small batch, form it on a screened mould, and transfer the wet sheet to absorbent cloth to dry. For the most predictable shade, test color in a small amount of pulp before making a full vat: pigment needs to stay attached to the fibers, while dyes can bleed or fade. The fiber and how finely it is blended also affect the paper’s thickness, texture, and finish.
Choose the color method that suits the paper
For a simple starting point, pulp colored scrap paper along with plain paper. For more control, add a colorant to the pulp. The choice matters: pigments and dyes behave differently, and neither guarantees the same result across different fibers or batches.
| Method | Appearance and handling | What to watch |
|---|---|---|
| Recycled colored paper | A straightforward way to add color while making pulp. | The resulting shade depends on the colors and proportions of the papers used. |
| Pigment | Color is carried by particles in the pulp and can be vivid. | Pigment does not dissolve into fiber like dye. A retention agent helps it attach to fibers; follow the pigment supplier’s pulp-based instructions. The craft guidance from Hand Papermaking suggests looking for colored pulp with relatively clear surrounding water and no color transfer when a small pulp sample is pressed on blotter. |
| Dye or natural dye liquid | Dyes enter fibers and can create translucent color and subtle variation. Plant material can be soaked, boiled, and strained to make a dye liquid. | Many dyes are water-soluble, so color may bleed into felts, blotters, or the vat, and dyed sheets may fade in sunlight and oxygen. The Eric Carle Museum’s natural-color experiments include turmeric, carrot juice, berries, beet, dandelion greens, coffee, and charcoal; these are craft experiments, not archival dye recipes. |
Color retention varies with fiber, beating, water quality, additives, time, and temperature. Make small test batches and note the paper, colorant, and amounts so you can adjust a later batch. Do not keep adding pigment once the fibers appear saturated; more colorant alone may not improve retention. Hand Papermaking’s chemistry guidance appears in a page published October 16, 2024, which reprints a 1998 beginner column; for a specific product, use the supplier’s current instructions.
Gather tools and prepare scrap paper
- Scrap paper, a tub or basin, and a blender reserved for papermaking.
- A mould and deckle, or a framed screen; a tray-and-screen arrangement can also work. See Museum of Fine Arts Boston’s handmade-paper instructions.
- Absorbent felt or towels, a sponge, and a board or tray for supporting the sheet.
- Optional gloves and an apron, especially when using bright colorants that may stain skin or clothing.
Tear the paper into small pieces and soak them in water. Blend the softened pieces with more water than paper until the pulp reaches the texture you want. More blending generally gives a smoother-looking, smoother-feeling sheet; a thinner mixture with more water relative to pulp makes a thinner sheet. The fiber itself matters too: MFA Boston notes that stronger drawing, printmaking, and watercolor papers work well, though many recycled papers can be used.
#1 Best Overall
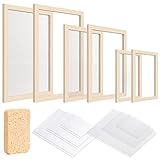
- 【Educational and Fun Experience】: DIY Paper Making Kit is a great choice to spend time with family, which can help users learn about the papermaking process and raise their awareness of saving paper. It provides a fun and engaging DIY activity that can be enjoyed by crafters of all ages. The handmade paper can be used to make cards, nature diaries, labels, stationery, bookmarks, and more
- 【Variety of Sizes】: The paper making kit includes multiple sizes of paper making frames—A4, A5, A6 (5 x 7 inches, 7.5 x 9.8 inches, 9.8 x 13 inches), which makes the paper making frame kit versatile and useful for various paper crafting needs. This variety caters to different preferences and DIY art and craft projects
- 【Sturdiness & Durability Materials】: Caydo paper making frame kit is made of sturdy natural wood and mesh for the frames, and the sponge is made of wood pulp cotton, which has better water absorption. Note: The yarn mesh is not too elastic, so please do not use strong pressure during the process of making paper
- 【Easy to Use & Beginners Friendly】: The paper making kit includes clear instructions, making it beginner-friendly. The process is simple: 1.Place the mesh between two wooden frames of the same size. 2.Insert the frame (mesh-free side up) into prepared pulp. Add glitter or dried flowers if desired. Wait for even pulp coverage. 3.Remove, cover with absorbent paper, and sponge to absorb water. 4.Take the paper off the frame and sun-dry before use
- 【Value for Money】: The paper making kit contains 6 paper frames of 3 sizes A4 A5 A6 (each size frame has a fixed mesh screen), 6 mesh of 3 sizes, 6 absorbent paper of 3 sizes (2 for each size), and 1 sponge to meet your need for different sizes of paper. It is a cost-effective option for enjoying the papermaking process
The American Museum of Natural History’s activity uses about 1½ cups of dry paper per sheet as a guide, not a universal ratio; sheet size and pulp mixture change how much is needed. See its make-your-own-paper activity for that project’s instructions. Keep the blender out of food use afterward: the Eric Carle Museum specifically advises that a blender retired for paper craft should not be used for food again.
Tint pulp and form a sheet
- Make a small color trial. Set aside a portion of pulp and stir in the colorant. For dry pigment, first disperse it in water and pass it through fine mesh to remove lumps; water-based artist colors can also be dispersed in water. Use a retention agent for pigment according to the product’s instructions. Red and yellow pigments can be harder to retain than browns and blues, so test rather than assuming one amount will work for every color. See Hand Papermaking’s guidance on color and pigments.
- Check whether color stays with the pulp. If using pigment, observe the vat water and press a small amount of pulp onto blotter. Colored pulp, clearer surrounding water, and no color transfer to the blotter are useful signs of retention, not a guarantee of long-term lightfastness. If color washes into the water, reassess the retention process rather than automatically adding more pigment.
- Prepare the vat. Mix the pulp into a tub of water. Tint separate small batches if you want multiple colors, and record what went into each one. Stir the vat so pulp is distributed before forming each sheet.
- Pull the sheet. Dip the screen or mould at an angle, then scoop or draw it through the slurry. Bring it level to collect a reasonably even layer and let excess water drain. Fiber and pulp amount affect the finished sheet’s look, thickness, and feel.
- Couch the sheet. Flip the screen onto absorbent felt or a towel. MFA Boston defines the step this way: “Couching is transferring your wet sheet from the mould to a flat, absorbent surface.” Sponge through the screen, especially around the corners, then lift the mould carefully.
- Dry the paper. Leave the sheet on felt or towels for a few days. After the first day, check whether it can be gently lifted or turned without tearing.
Make patterns and surface variations
Solid color
Tint one batch of pulp before forming the sheet. Compare the wet pulp with the dried paper: the shade can look different after water drains and the sheet dries.
Rank #2

- Package Included: The paper making frames set come in 4 sizes to accommodate different paper making projects. Each set includes a bottom frame with fixed mesh, a top frame without mesh, 2 pieces of single mesh, 2 absorbent papers, and 1 sponge.
- This paper making kit includes 4 sets of screens in different sizes, A4(10"x13.4"), A5(7.5"x 10"), A6(5"x 7"), A7(4"x 5"), for crafting paper at home. The bottom frame has a thickness of 0.59 inches, while the top frame has a thickness of 0.39 inches. The paper making frames have precise inner measurements to ensure a perfect paper-making process every time.
- Premium Material: Our paper making frames are made of natural pine wood and durable mesh material, designed for easy use with cotton pulp materials, and ensure easy and efficient paper creation with the included sponge for water absorption. Perfect for DIY paper making and crafting projects.
- How to Use? Follow simple steps to create your own paper using this kit. Use original wood or cotton pulp materials, or recycle paper, and get creative with decorations like dried flowers, inks, and acrylic paints. Clean the frames after each use for long-lasting durability.
- Educate and entertain kids by showing them the art of making paper while promoting environmental awareness, and enjoy quality family time with this DIY paper making kit. Decorate your handmade paper with dried flowers, leaves, and colors for a personalized touch.
Gradient or layered color
Use separate colors in sequence, or dip only part of the mould into one color and layer another as the sheet forms or dries. The Eric Carle Museum describes a blended-color effect from this approach in its papermaking experiments.
Pulp painting
Place different colors of pulp onto the screen with a baster or similar tool, then drain the water. This lets you arrange color on the sheet rather than mixing all the pulp into one uniform shade.
Rank #3

- Package Included: A kit comprising 4 sets of paper-making screens in varying sizes. Each set screen includes 1 bottom frame with a fixed mesh, 1 top frame without mesh, 2 pieces of single mesh, 2 absorbent papers. Whole kit has 1 sponge
- Size(approx.): The overall sizes of the twin paper making frames are as follows: A4 (9.8"x13.4"), A5 (7.5"x 9.8"), A6 (5.5"x 7.7"), and A7 (4.5"x 5.7"). The inner measurements of the frames are A4 (8.3"x11.7"), A5 (5.9"x 8.3"), A6 (4"x 6"), and A7 (3"x 4"). The bottom frame has a thickness of 0.59 inches, while the top frame has a thickness of 0.39 inches
- Material: Made of natural wood and mesh composition, the yarn has limited elasticity; therefore, please avoid applying excessive pressure during the paper-making process
- Fun & Educational Family Activity: An engaging DIY project to bond with kids while teaching them papermaking and the importance of recycling and environmental protection. Use wood pulp, cotton, or recycled paper and personalize with dried flowers, leaves, inks, or paints to create unique, handmade sheets
- Easy Cleanup & Care: Simply rinse the wooden frames and mesh after use and let them air dry for ready reuse; handle with care to preserve the mesh
Flecks and embedded texture
Add flowers, leaves, thread, or other small decorative inclusions after blending the pulp. Keeping objects out of the blender preserves their shape and texture; both MFA Boston and the Eric Carle Museum describe adding materials at this stage.
Quick Recap
Rank #4
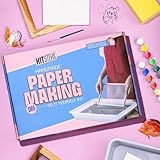
- WHAT'S INCLUDED: This complete paper making kit includes everything you need to get started, including a mould and deckle, a tray, a sponge, paints, seeds, threads and access to a detailed video tutorial. Learn the traditional deckle technique and create endless variations of paper using petals, seeds, threads, and even using paints for colored paper.
- ENDLESS CREATIVE POSSIBILITIES: Turn your handmade paper into beautiful greeting cards, personalized letters, custom stationery, unique art projects, and more! Draw, write, paint, and even print on your own handcrafted paper. This craft kit for adults - men and women, hours of creative fun and a rewarding sense of accomplishment.
- ECO-FRIENDLY FUN FOR ALL: This DIY kit is a great way to teach everyone about recycling and sustainability. It's the perfect art & craft kit for adults and a fun family activity. Make a positive impact on the environment while enjoying a creative and engaging project.
- EASY TO USE & REUSABLE: With our easy-to-follow video tutorial, you'll be making your own paper in no time! The mould and deckle are reusable, allowing you to create countless sheets of paper. Project time: 20 minutes. Drying time: 3-5 hours (depending on climate).
- HELP SAVE TREES: Did you know billions of trees are cut down each year for paper production? This paper making kit empowers you to make a difference by recycling and creating your own paper. Join us in making the world a little greener!
How to get more consistent color
- Keep the paper source and pulp preparation consistent when comparing color trials.
- Change one variable at a time—such as colorant amount or retention approach—and record the result.
- Judge the shade on a dried sheet as well as in the vat; wet pulp does not show the finished appearance exactly.
- Expect some variation from water quality, fiber type, beating, additives, time, and temperature.
- Use absorbent materials you are willing to stain when working with dyes, and clean tools and surfaces promptly.

Product prices and availability are accurate as of the date/time indicated and are subject to change. Any price and availability information displayed on Amazon at the time of purchase will apply.




