Quick wins for a faster PC:
Fix the driver behind crashes, sound loss and screen glitchesFind Drivers →Repair Windows errors before they cause bigger problemsFix Now →Scan for outdated or missing drivers - takes under a minuteDriver Scan →
ThatPainter is reader-supported. When you buy through links on our site, we may earn an affiliate commission. Learn More
To make one continuous length of bias binding from a square of fabric, cut the square diagonally into two triangles, sew them into a parallelogram, mark parallel strip-width lines, join the edges into an offset tube, then cut along the marks in a spiral. This method is especially useful for curved or scalloped quilt edges, where bias binding’s stretch helps it follow the shape.
Why choose bias binding?
Bias binding is cut diagonally across the fabric, so it has more give than binding cut along the straight grain. That stretch helps it fit curved and scalloped edges. It can also draw attention to a fabric design, such as a stripe. Bias binding uses more yardage than other binding approaches, but this continuous-strip method turns a square into one long strip. The tutorial describes it as a way to prevent fabric waste; it does not provide a measured fabric-savings figure. AllPeopleQuilt’s tutorial, updated June 8, 2021, demonstrates the technique.
As an Amazon Associate I earn from qualifying purchases.
Outdated Drivers Are Slowing You Down
One free scan finds every outdated or missing driver and matches the right update for your exact hardware.Free scan · exact hardware matchWindows Errors? Fix Them Before They Spread
Repair common Windows errors and clear accumulated junk for a smoother, more stable PC - no reinstall needed.Free scan · no reinstallEstimate the square size
Use the tutorial’s calculation to estimate the square: multiply the total binding length you want by the desired strip width, take the square root, round up to the next whole number, then add 3 inches for seaming. The 3-inch allowance is part of the tutorial’s formula, not a guarantee for every fabric or seam plan.
For its example, the tutorial calculates 135 inches of binding at 2½ inches wide:
#1 Best Overall

- QUICKLY MAKE BIAS BINDING: The Jeimier 5 sizes professional Bias Tape Makers out of any fabric to match your binding quilts projects. Make your own bias tape in minutes
- BETTER THAN BY HAND: Easy to use for making almost bias tape you choose to make, once you get the hang of it. This Bias Tape Tools will save you lots of time
- TYPES OF BIAS TAPE MAKERS: It is important to note the Jeimier bias binding maker comes in 5 widths. The binding maker for quilting, 1/4" 3/8" 1/2" 3/4" 1". Elevate your binding and quilting performance
- MAKE QUILTS POP: One easy motion creates any length bias tape without fumbling with creases. If you ever tried to make bias binding you know how difficult it is. This binding maker makes it easy
- CONDUCIVE TO QUILTING SIZES: Use 12 mm width with this 6 mm bias tape folding tool. Use 18 mm width with this 9 mm bias tape tool. Use 24 mm width with this 12 mm bias binding maker. Use 36 mm width with this 18 mm bias quilting maker. Use 46 mm width with this 25 mm bias tape maker. The Jeimier 5 sizes of bias tape making tool help you take any size you want. Elevate your binding and quilting performance. Since the bias tape maker's dimensions are in millimeters, you need to convert them to inches
- Multiply 135 by 2½ to get 337.5.
- Take the square root: approximately 18.37.
- Round up to 19, then add 3 inches for seaming.
- Use a 22-inch square.
This is the tutorial’s worked example; treat it as an estimate for planning rather than an independently verified result for every fabric.
What you’ll need
- A square of fabric sized for your binding plan
- A fabric marker or pencil
- A ruler to mark the strip width
- Pins
- A sewing machine for the ¼-inch seams
A quilting ruler can make it convenient to mark parallel lines at a consistent width, but no particular brand or specialty model is required. The technique uses fabric you already have; it does not require buying new yardage.
Recommended Free Tools
Rank #2
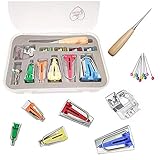
- Bias Tape Maker Kits OF 5 Sizes 1/4"(6MM) 3/8"(9MM) 1/2"(12MM) 3/4"(18MM)1"(25MM)
- You will get 4pcs craft clips ,1pc binder foot and awl ,10pcs quilting pins, 5 different size bias tape maker
- The binder foot will fit for Brother, Babylock, Janome, Kenmore, Singer and many more sewing machines that use a snap on foot.
- Bias tape maker can be widely used in various leathercraft, tailor patchwork, DIY and much more
Make continuous bias binding
1. Cut the square into triangles
Cut the fabric square in half diagonally to create two triangles.
2. Sew the triangles into a parallelogram
Place the triangles right sides together, aligning two short edges. Sew with a ¼-inch seam allowance, then press the seam allowances open.
Rank #3

- Bias tape makers set of 5 sizes :1/4" 3/8" 1/2" 3/4" 1" Set ( 6mm 9mm 12mm 18mm 25mm)
- A precision tool that folds fabric into perfect halves automatically ,the sewing binding tool Easy to use, quick, precise, economical. Perfect for creating your own bias tapes in minutes
- Make any fabric into an accent, border or trim. Its fast, economical and perfectly coordinated. Pull the fabric through and iron--folds it perfectly, ready for sewing on or gluing
- Using Directions: Size 6mm: fit for cut the fabric 12mm widths; Size 9mm: fit for cut the fabric 18mm widths; Size 12mm: fit for cut the fabric 24mm widths; Size 18mm: fit for cut the fabric 36mm widths; Size 25mm: fit for cut the fabric 46mm widths
- HOW TO USE:1.To cut bias strips first cut across the fabric at a 45° angle then cut strips parallet to this freshly cut edge in the width you need.2.Wrong side up feed bias strip into wide end of tape maker use awl to pull fabric through.3.Pin end of strip to ironing board Pull tape maker and press in folds keep iron close to tape maker.
3. Mark the strip-width lines
Using a ruler and fabric marker or pencil, draw lines parallel to the long bias edges. Space the lines by the width you want for your binding; the tutorial uses 2½ inches as an example.
4. Join the fabric into an offset tube
With right sides together, bring the straight-grain edges together and align the raw edges. Shift the fabric so the top edge meets the first marked line on the opposite edge, rather than lining up the corners. Pin the layers in place.
Free tools Windows power users keep installed
One-click scans. No signup required.
Rank #4

- HONEYSEW Bias Tape Maker Sewing Quilting Tools
- Create your own bias tape with the HONEYSEW bias tape maker. Simple and Easy. Your creation will look professional with clean finished product from homemade napkins, handbag, bibs and etc
- Bias Tape Maker Set Of 4 6MM 12MM 18MM 25MM top quality
5. Sew and press the second seam
Sew the aligned bias edges together with a ¼-inch seam allowance, then press the seam allowances open.
6. Cut the strip in a spiral
Begin at the top marked line and cut continuously. When the cut reaches a seam, move down to the next marked line and continue around the tube. The offset alignment lets the cut carry on across the seams as one strip.
Best Value

- Bias Tape Set for Sewing:5 different size binding maker 1/4" 3/8" 1/2" 3/4" 1" (6mm 9mm 12mm 18mm 25mm),4pcs craft clips ,1pcs binder presser foot and wooder awl ,10pcs Bead Head Pins
- Practical Bias Tape Maker Kits with Instruction:Make bias tapes in minutes,make any fabric into an accent, border or trim. It's fast, economical and perfectly coordinated. Pull the fabric through and iron--folds it perfectly, ready for sewing on or gluing
- Bias Maker Kits can be widely used in various leathercraft, tailor patchwork, DIY ,making baby clothes, bib.Make stems and vines for Applique,strips for quilt as go quiltmaking ,bias tape for celtic or stained glass applique and bag handles
- Bias Tape Maker,include The binder presser foot for Brother, Babylock, Janome, Kenmore, Singer and many more sewing machines ,so you can buy this binding tape maker kit
- Fabric Bias Tape Maker tools kit with box easy to store.You can make bias in minutes whenever you want .
7. Attach the binding
Prepare the finished strip as you would ordinary quilt binding and sew it to the quilt. Ease the bias binding gently around curves instead of stretching it tight; as Lindsay says in the tutorial’s video, “since bias binding is stretchy, avoid pulling it too tightly when you’re sewing it to the quilt.”
Quick Recap

Product prices and availability are accurate as of the date/time indicated and are subject to change. Any price and availability information displayed on Amazon at the time of purchase will apply.




