Quick wins for a faster PC:
Windows Errors? Fix Them Before They Spread
Repair common Windows errors and clear accumulated junk for a smoother, more stable PC - no reinstall needed.Free scan · no reinstallOutdated Drivers Are Slowing You Down
One free scan finds every outdated or missing driver and matches the right update for your exact hardware.Free scan · exact hardware matchFix the driver behind crashes, sound loss and screen glitchesFind Drivers →Repair Windows errors before they cause bigger problemsFix Now →Scan for outdated or missing drivers - takes under a minuteDriver Scan →
ThatPainter is reader-supported. When you buy through links on our site, we may earn an affiliate commission. Learn More
To sew fabric hexagons together by machine, mark the seam intersections near each corner, align and pin the edges, then stitch one seam at a time from dot to dot. Stop at each marked point rather than sewing across the junction: those stopping points let the seams meet neatly in the Y-shaped joins.
How machine-pieced hexagons fit together
Hexagons have angled edges that meet at junctions. When you join them by machine, the seams need to stop at the points where the seam allowances intersect. That makes each join a Y seam. It is different from English paper piecing, which joins fabric hexagons by hand.
As an Amazon Associate I earn from qualifying purchases.
Do these 3 things before closing this tab:
1Fix the driver behind crashes, sound loss and screen glitches2Repair Windows errors before they cause bigger problems3Scan for outdated or missing drivers - takes under a minuteThe central technique is straightforward, but accurate marking and careful stopping matter. American Patchwork & Quilting’s tutorial uses a quarter-inch seam allowance and has you sew carefully from dot to dot, one seam at a time. See its machine-sewing demonstration; Diary of a Quilter explains the Y-seam intersections.
What you need
- Fabric hexagons cut consistently for your chosen pattern.
- A way to mark the seam intersections on the wrong side of the fabric.
- A sewing machine and thread.
- Pins to hold adjoining edges in alignment. Glue basting is an optional alternative for controlling joins, not a requirement.
- A way to maintain a quarter-inch seam allowance, such as careful measuring or a compatible quarter-inch presser foot.
A specialty hexagon ruler is optional. You can cut hexagons with a rotary cutter and standard ruler, use precut pieces, or use a paper or plastic template. The best setup is the one that lets you cut consistent pieces and mark their seam points accurately. Purple Daisies Quilting describes rotary-cut and precut options; Red Pepper Quilts discusses paper and plastic templates.
#1 Best Overall
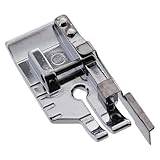
- Use this foot when pivoting, topstitching, or for 1/4" seams.
- Reference markings on the side of the foot for visibility and accuracy.
- Flat bottom ensures that the material will make good contact with the feed dogs.
- Guide on foot makes it easy to obtain a 1/4" seam allowance. Place the edge of the fabric against the guide while you sew.
- This 1/4 inch snap-on foot is compatible with most low shank machines (adapter may be required).
Step-by-step: sew hexagons by machine
- Mark the seam intersections. On the wrong side of each hexagon, mark the points where the quarter-inch seam lines would intersect near the corners. These dots are the start and stop points for the seams. A template or ruler with a hole at the relevant intersection can make repeated marking quicker, but careful measuring works too.
- Align two adjoining edges. Place the hexagons with right sides together and match the edge you plan to sew. Check that the marked points at both ends of that edge line up. Pin the edge so it will not shift as you sew.
- Sew from dot to dot. With a consistent quarter-inch seam allowance, stitch from one marked point to the other. Stop at the dots; do not carry the stitching through the junction. The marked intersections control where the Y-seam arms meet.
- Continue one seam at a time. Align and sew the next adjoining edge using the same dot-to-dot method. Continue joining pieces or rows in the order required by your quilt pattern, checking the intersections as you go.
- Press the first intersection as directed. In its instructions, American Patchwork & Quilting presses the first seam intersections counterclockwise so they form a small hexagon on the wrong side. Treat this as tutorial-specific pressing guidance; follow your pattern’s instructions if they differ.
Choose a cutting and marking setup
| Option | Useful when | Trade-off or qualification |
|---|---|---|
| Rotary cutter and standard ruler | You already have these tools and can cut consistent shapes. | Purple Daisies Quilting describes a method that does not require a special hexagon ruler or plastic template. |
| Paper or plastic template | You want a repeatable shape for cutting and marking. | Red Pepper Quilts describes a sturdy paper template as an alternative and a plastic template as helpful for cutting and marking seam allowance. |
| Dedicated hexagon ruler | You want a purpose-made tool for repeat cutting or marking. | It is a convenience, not a requirement. AccuQuilt’s ruler instructions apply to its own product. |
| Precut hexagons | You want to skip cutting the shapes yourself. | Check that the pieces are consistent and that you can identify the seam intersections accurately. |
For marking speed, a template or ruler that helps locate the quarter-inch intersections may reduce repeated measuring. A quarter-inch presser foot can help guide stitching without drawing full seam lines, but check that the foot is compatible with your machine. AccuQuilt’s instructions cover its hexagon ruler.
Independent reader supportYour contribution helps us test, update, and keep practical guides available for everyone.Keep the Y seams accurate
- Check the dots before sewing. If the marked points do not align when edges are matched, correct the alignment before stitching.
- Stop at each intersection. Sewing past a dot can carry a seam through the junction instead of leaving the seam arms to meet there.
- Work in manageable joins. Pin and sew one edge at a time rather than trying to handle a large joined section at once.
- Keep the seam allowance consistent. A quarter-inch allowance is used in the cited tutorials; no universal machine setting is specified, so use a guide or foot that suits your machine and verify the result on your pieces.
Glue basting is another handling option: Purple Daisies Quilting demonstrates it for managing Y seams. Pinning is also part of the AllPeopleQuilt method, so glue is not necessary.
Quick Recap
Best Value

- O(∩_∩)O Enhances Functionality:This walking foot attachment set is compatible with Brother sewing machines, as well as part Singer 、Janome models, making it a versatile addition to your crafting tool kit.
- O(∩_∩)O Precision Crafted: The unique design allows for even fabric feeding from both the top and bottom, preventing shifting and puckering.
- O(∩_∩)O Easy Installation:The user-friendly design ensures quick and easy attachment to your sewing machine, so you can focus on your creativity without hassle.
- O(∩_∩)O Compact Size: Measuring W/Guide Walking Foot Presser Foot at 3.4 x 3.4 x 1 inches and Metal Free Motion Quilting Darning Presser Foot at 2.4 x 1.2 x 0.7 inches and 1/4 inch Snap on Foot at 1.4 x 0.6 x 0.3 inches weighing only 0.20 lbs, this walking foot set is easy to store and transport.
- O(∩_∩)O After-sales:We promise to provide you with a high-quality after-sales and we will reply your questions in time to sure an excellent Shopping experience.
Rank #4

- High-Quality Metal Construction: The AMZTKDIY Free Motion Quilting Darning Foot is crafted from premium metal, ensuring exceptional durability and long-lasting performance. Its polished surface resists rust and maintains a bright finish, making it a reliable tool for all your sewing projects
- Enhanced Visibility & Precision: Featuring an open-toe design, this presser foot provides excellent visibility, allowing you to easily follow intricate patterns and designs for free motion quilting, embroidery, stippling, and thread painting, ensuring precise stitching every time
- Spring-Loaded Design for Smooth Operation: The spring-loaded mechanism keeps the fabric flat and prevents lifting as the needle moves, reducing skipped stitches and thread breakage. This makes it suitable for working with thick materials like hollow cotton, silk, and leather
- Versatile & Creative Freedom: Unleash your creativity with the AMZTKDIY presser foot. Whether you're quilting, darning, or embroidering, this foot allows you to experiment with various techniques and patterns, making it a must-have for sewing enthusiasts and professionals alike
- Wide Compatibility: Designed to fit most low-shank sewing machines, including Brother, Singer, Janome, Juki, Babylock, Kenmore, White, Euro-Pro, Elna, Simplicity, and more. This presser foot is a versatile addition to your sewing toolkit, ensuring seamless compatibility across multiple brands
Rank #3

- Universal Compatibility: This walking foot attachment is designed to fit Brother, Singer, Janome, and all low shank sewing machine models. Whether you own a Brother walking foot sewing machine or a Singer walking foot sewing machine, this accessory ensures seamless integration and enhanced stitching performance
- Effortless Fabric Handling: Achieve smooth, even fabric feeding without puckering or shifting, making it ideal for quilting, layered fabrics, and thick materials like denim or upholstery. The walking foot for Brother sewing machine guarantees professional results every time
- Perfect for Quilting & DIY Projects: Specifically designed for quilters and crafters, the Brother walking foot for quilting enables precise stitch control when working with multiple fabric layers. It’s also great for sewing stretchy fabrics, vinyl, and leather
- Enhanced Stitching Precision: Unlike standard presser feet, this walking foot attachment mimics the action of industrial sewing machines by evenly feeding top and bottom layers simultaneously. Say goodbye to mismatched seams and fabric drag
- Durable & Easy to Use: Crafted from high-quality materials, this walking foot brother accessory is built to last. It installs in seconds without tools and includes clear instructions for quick setup, making it suitable for beginners and experts alike
Rank #2

- Open toe for decorative stitching: The open toe design allows space for dense decorative stitches to glide easily under the foot, for more consistent stitching
- Manage tricky fabrics such as plaids, knits and slick minky cloth easily with Open Toe Walking Foot with guide bar. This modern twist on the classic walking foot provides a clear view of the stitching area
- Heavy duty construction: engineered for precision and designed for use even with thicker fabric layers
- Widely compatible with popular sewing and quilting machine brands, HONEYSEW open toe walking foot fits on low-shank models of Euro-Pro, Kenmore, White, Necchi, Singer, Brother, Husqvarna Viking, Toyota, Pfaff and more.
Common problems and what to check
- The points do not meet cleanly: Check whether the seam intersections were marked accurately and whether the dots stayed aligned while pinning and sewing.
- The seam runs through the junction: Recheck the start and stop points. Each seam should end at its marked dot rather than continue across it.
- The edges shift while stitching: Pin more carefully or try glue basting if that handling method suits your fabric and pattern.
- The seam allowance varies: Use a consistent guide and check compatibility if using a quarter-inch foot. The tutorials do not specify a universal machine setting.

Product prices and availability are accurate as of the date/time indicated and are subject to change. Any price and availability information displayed on Amazon at the time of purchase will apply.




