ThatPainter is reader-supported. When you buy through links on our site, we may earn an affiliate commission. Learn More
MokeyLaser is buildable, but it is not a finished plug-and-play engraver. It is an open-source X-Y diode-laser project built from 2040 aluminum extrusion, 3D-printed parts, GT2 belts, NEMA 17 motors, an Arduino Uno/CNC Shield controller, GRBL 1.1 firmware, and a 455 nm laser module. The design is accessible to an experienced maker—not risk-free or beginner-proof.
MokeyLaser is buildable, but it is not a finished plug-and-play engraver. It is an open-source X-Y diode-laser project built from 2040 aluminum extrusion, 3D-printed parts, GT2 belts, NEMA 17 motors, an Arduino Uno/CNC Shield controller, GRBL 1.1 firmware, and a 455 nm laser module. The documented design is accessible to an experienced maker who can square a frame, wire electronics, configure firmware, calibrate motion, and design a proper laser-safety system.
The word “easily” needs qualification. The mechanical parts are relatively common and the repository supplies build files and a bill of materials, but the original open-frame presentation is not a suitable safety solution. Before operating the laser, plan a wavelength-appropriate enclosure, access control or interlock, emergency-stop method, warning labels, extraction, and correctly specified protective eyewear.
#1 Best Overall
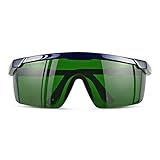
- Wavelength: 200nm-2000nm, broad spectrum protection, block UV, Blue, Red and Infrared Laser Light
- Optical density: OD 4+; Visible light transmittance: 15%, Enhance Green laser line or beam at daylight
- ANSI Z87.1 standard approved.
- Compatible with 405nm, 445nm, 450nm, 650nm laser light etc, for laser hair removal, ipl lights and laser beauty treatment
- Packing List: Goggles with Case and Clean Cloth
What MokeyLaser is
The primary source is the public MokeyLaserV1 repository, which contains the project files, 3D models, images, license information, and a purchased-parts list. Hackaday’s September 14, 2022 overview describes the project as a custom X-Y machine designed after its creator found an open-frame commercial engraver expensive and limiting.
Mechanically, MokeyLaser is a moving-gantry machine. Its 2040-style V-slot aluminum extrusions form both the frame and the rolling surfaces for V-wheel gantries. A pair of stepper-driven axes positions the laser over the workpiece. Most custom brackets and structural pieces are intended to be 3D printed rather than machined from metal.
That approach makes the design attractive for a maker who already has a 3D printer and common CNC hardware. It also moves much of the final performance into the builder’s hands. Frame squareness, printed-part accuracy, wheel preload, belt tension, pulley alignment, wiring, and laser focus will matter as much as the parts list.
Documented MokeyLaser hardware
| Subsystem | Documented parts or design | What the builder must verify |
|---|---|---|
| Frame and motion | Five 1000 mm 2040 V-slot extrusions, V-slot gantry wheels, GT2 timing belt, 20-tooth GT2 pulleys, corner connectors, T-nuts, and metric fasteners | Frame dimensions, squareness, wheel preload, belt alignment, and the actual usable travel |
| Drive | Three bipolar NEMA 17 stepper motors and motor cables | Motor current, connector wiring, driver settings, and whether replacement motors match the mechanical design |
| Controller | Arduino Uno R3, CNC Shield V3, and A4988 stepper-driver modules | Driver orientation, current limiting, cooling, grounding, and compatibility with the chosen power supply |
| Limit detection | Mechanical endstops | Correct switch placement, repeatability, cable routing, and GRBL configuration |
| Laser | SainSmart FL55, listed as a 455 nm module with TTL/PWM control and described by Hackaday as a 5.5 W module | Current model, optical output, connector, mounting, power requirements, control polarity, and safety documentation |
| Firmware | GRBL 1.1 on the Arduino-based controller | Correct step calibration, travel limits, homing behavior, laser-mode settings, and sender compatibility |
The repository’s specifications should be treated as the reference for the particular MokeyLaser V1 design. They do not establish a universal working area, maximum speed, positional accuracy, or material capability. The 1000 mm extrusion length is not the same thing as finished travel: wheels, brackets, belts, the gantry, margins, and the laser mount all reduce usable space.
Parts sourcing and the historical cost
The repository records an Amazon subtotal of $383.59 and a Grainger subtotal of $19.02, for a documented total of $402.61. That is a historical project BOM, not a current quotation. Prices, stock, sellers, shipping, tax, and product revisions can all change.
For the laser portion, the documented build names the SainSmart FL55 laser module 455nm TTL PWM. Before buying that or any substitute, compare the actual optical output—not merely an advertised electrical input rating—along with wavelength, TTL/PWM behavior, connector, mounting arrangement, power supply requirements, and safety documentation. A visually similar diode module is not automatically electrically or mechanically compatible.
The rest of the sourcing list consists of relatively familiar maker hardware: an Arduino Uno R3, CNC Shield V3 with A4988 drivers, NEMA 17 motors, GT2 belt and pulleys, 2040 V-slot extrusion, V-slot wheels, endstops, T-nuts, and metric screws. Substitutions are possible, but check the details that affect fit and operation: belt pitch, pulley tooth count and bore, extrusion profile, screw length, motor current, driver adjustment range, connector polarity, and the laser’s control interface.
Rank #2
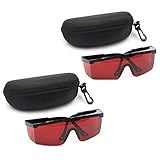
- 2PCS glass+2case, Protection Features: All-round absorption.
- 2 glasses and 2 glasses box,Multiple colors to choose,Size: Approx 14.5 x 5.5 cm / 5.70" x 2.17"
- The durable structure, the soft plastic is super light, and the single weight is about 18g. It is stress-free and comfortable to wear for a long time.
- Adjustable frame, the length of the glasses frame can be adjusted to 4 modes (9-11.4cm/3.5-4.4 inch), which can be superimposed on ordinary glasses.
- Goggles Laser Glasses With Free Velvet Box 190nm to 540nm Laser protective eyewear With Box
Why the Arduino Uno and GRBL combination matters
The Uno R3 is an ATmega328P-based board with a 16 MHz clock, 14 digital I/O pins, six PWM-capable outputs, and six analog inputs. Paired with a CNC Shield V3 and A4988 modules, it provides a familiar low-cost control platform for the two motion axes and the laser interface.
Do these 3 things before closing this tab:
1Clear out junk files and repair common Windows errors2Fix the driver behind crashes, sound loss and screen glitches3Repair Windows errors before they cause bigger problemsGRBL 1.1 is widely used in small CNC machines and works with many open-source G-code senders. Some workflows can be integrated with Inkscape, although there is no single mandatory design or sender application established by the project sources, and software support varies by operating system and application version. Confirm the sender’s GRBL 1.1 support before building your workflow.
Do not assume that installing firmware completes the setup. GRBL still needs machine-specific configuration for steps per millimeter, maximum rates, acceleration, homing, travel limits, direction, and laser behavior. The exact values depend on the motor step angle, microstepping, pulley size, belt pitch, and mechanical arrangement.
Safety is part of the build, not an accessory
The repository warns that the lasers used in or inspired by the project can severely damage or blind eyes and can burn or damage skin. Arduino’s project coverage recommends a shielded enclosure for engraving or cutting lasers. The original open-frame machine should therefore be treated as a mechanical reference, not as a safe operating configuration.
Before optical operation, provide all of the following:
- A light-blocking enclosure: Its material must be appropriate for the installed wavelength and optical power. Clear plastic, tinted acrylic, or improvised panels should not be assumed to block hazardous radiation.
- Access control: The laser should not be able to fire when a door or removable panel is open. Use a properly designed interlock or equivalent hardware control; software alone is not enough.
- An emergency-stop method: It must remove the relevant hazard promptly and be reachable without placing a person in the beam path.
- wavelength-appropriate eyewear: Select protection for 455 nm and the required optical density using competent safety guidance or the laser manufacturer’s documentation. Ordinary sunglasses are not laser protection.
- Warning labels and controlled access: Mark the enclosure and keep untrained people, children, and pets away from the machine.
- Smoke and fume management: Use suitable extraction or ventilation for laser-generated contaminants. A room fan is not a substitute for a controlled exhaust arrangement.
- Reflection control: Treat shiny metals, mirrors, tools, jewelry, and other reflective surfaces as potential stray-beam hazards. Never look into the beam or rely on a camera view as proof that an area is safe.
FDA consumer guidance discusses certification and identification labeling for laser products, while OSHA guidance emphasizes hazard assessment, training, warning controls, and protective enclosures with suitable interlocks or labels. Those references support treating laser safety as a design requirement from the beginning—not as a later add-on after the machine has already been tested.
Rank #3

- Eye Protection: Effectively protects eyes from laser harm while keeping them comfortable.
- Wide Compatibilities: Compatible with 316nm-450nm & 900nm-1080nm lasers, including xTool F1, F1 Ultra, S1, M1 Ultra, M1, D1 Pro, and D1.
- Lightweight Design: Weighs only 50g, the frame is lightweight and comfortable to wear without any burden.
A safer build sequence
- Freeze the design version. Review the MokeyLaserV1 repository, CAD/STL folders, images, license, and BOM before ordering anything. Confirm that the printed parts and hardware list refer to the same revision.
- Inspect the printed parts. Check for warping, elephant’s foot, undersized holes, weak layers, and mounting surfaces that are not flat. Correct dimensional problems before they are built into the frame.
- Assemble and square the extrusion frame. Tighten corner hardware gradually and measure diagonals or use another repeatable squaring method. A frame that is slightly skewed can produce binding and inconsistent engraving.
- Install the V-wheel gantries. Adjust eccentric spacers so the wheels roll smoothly with no obvious play. Excessive preload can cause drag; insufficient preload allows the gantry to rock.
- Fit belts and pulleys. Keep the GT2 belts parallel to the extrusion and ensure each pulley is aligned with its belt. Tension should remove slack without overloading the motor or printed brackets.
- Mount the motors and endstops. Route motor and switch cables away from moving belts and the eventual optical path. Make sure an endstop is mechanically reached before a printed part or gantry crashes into the frame.
- Install the controller with power disconnected. Fit the Uno, CNC Shield, and A4988 modules in the correct orientation. Confirm the motor wiring and driver-current requirements from the relevant hardware documentation rather than relying on wire colors.
- Verify the laser interface before connecting the module. Confirm the module’s supply voltage, ground, TTL/PWM input requirements, connector pinout, and controller signal path. Do not guess at a laser pinout from a similar-looking product.
- Configure and test GRBL with the laser disabled or disconnected. Test direction, homing, endstops, jogging, travel limits, and coordinated motion without producing laser output.
- Complete the safety system before optical tests. Install the enclosure, interlock or access-control system, emergency stop, warning labels, and extraction. Test that opening access cannot leave the laser able to fire.
- Calibrate motion and focus under controlled conditions. Verify travel against measured movement, confirm repeatable homing, and use only supervised, low-risk tests with suitable materials and documented operating limits.
Calibration and troubleshooting priorities
The gantry binds or skips
Check frame squareness first, then wheel preload, pulley alignment, belt tension, and belt-to-frame clearance. A motor that skips is not necessarily underpowered; mechanical drag or an overly tight belt can produce the same symptom.
Engraving is doubled, wavy, or inconsistent
Look for belt slack, loose pulley set screws, gantry play, loose printed mounts, and a frame that is not square. Also confirm that the workpiece is flat and secure. Do not try to compensate for mechanical looseness only by changing software settings.
Homing is unreliable
Inspect switch placement, wiring, connector security, and GRBL homing configuration. The switches need a repeatable mechanical trigger, and their cables should be kept away from sources of electrical noise where practical.
The laser does not respond to power commands
Stop before troubleshooting by repeatedly enabling the beam. Recheck the module’s documented supply and TTL/PWM requirements, common ground, signal polarity, connector pinout, and the sender’s laser-mode behavior. Test the control path with the laser disabled whenever possible.
Cutting performance is disappointing
Diode-laser results depend on optical output, focus, material, color, speed, number of passes, and air assist. There is no universal material list or guaranteed cutting depth for this project. Some materials can produce hazardous fumes, and reflective materials can create additional beam hazards.
Independent reader supportYour contribution helps us test, update, and keep practical guides available for everyone.Air assist and possible upgrades
Hackaday reports that future plans included a modern 32-bit controller, a more powerful laser, and air assist. Air assist can help clear smoke from the beam path and may improve cutting behavior, but it does not replace an enclosure, extraction, interlocks, or eye protection.
Rank #4

- Ultimate OD6+ Broad Spectrum Protection: Provides OD6+ Optical Density blocking 99.9% of harmful laser radiation across critical wavelengths: 200-450nm (UV) and 800-2000nm (IR). Specifically designed to protect against prevalent lasers like 808nm, 980nm, 1064nm (Nd:YAG), 1320nm, and 1470nm. Our laser safety glasses ensure your eyes are safeguarded during high-power operations for industrial laser welding and cutting machines
- Safety and Reliability: These laser glasses eye protection are rigorously tested to meet CE standards. This guarantees they offer not only superior laser filtration but also high-impact resistance, providing you with all-around reliable laser goggles eye protection you can trust in demanding environments
- Enhanced Comfort for Extended Wear: Featuring an ultra-lightweight frame (only 0.8 oz), non-slip temple tips, these laser goggles are designed for all-day comfort. The ergonomic design reduces pressure and prevents slipping, allowing you to focus on your laser cleaning or marking tasks without distraction
- Durable and Impact-Resistant Construction: The 2.5mm thick coated optical polycarbonate (PC) lens is built to last. It can withstand accidental drops and resist scratches, having passed a rigorous 150J impact test. These OD6 laser safety glasses offer durable protection against both laser radiation and physical impacts common in workshops and laser rust removal sites
- Versatile Applications: These laser safety goggles are suitable for a wide range of applications. Essential for semiconductor and high-power Nd:YAG laser operations, industrial laser engravers, cutters, and welders. Also trusted for laser hair removal procedures. One pair for multiple high-precision scenarios
A higher-power laser is not an automatic upgrade. It changes the hazard profile and may require a redesigned mount, stronger power delivery, different controls, better thermal management, enclosure materials suited to the new risk, and revised operating procedures. Treat it as a new safety and engineering project rather than a simple module swap.
Windows Errors? Fix Them Before They Spread
Repair common Windows errors and clear accumulated junk for a smoother, more stable PC - no reinstall needed.Free scan · no reinstallOutdated Drivers Are Slowing You Down
One free scan finds every outdated or missing driver and matches the right update for your exact hardware.Free scan · exact hardware matchWho should build MokeyLaser?
MokeyLaser makes sense for a maker who wants to learn how a small CNC laser system is assembled and is prepared to adapt open-source files. Its strengths are the public design files, unusually clear component-level sourcing, common 3D-printer/CNC hardware, a familiar Arduino and GRBL ecosystem, and a modular structure that invites experimentation.
It is a poor choice for someone seeking a certified, enclosed machine that can be used immediately. The project does not provide authoritative performance figures for working area, speed, accuracy, or supported materials, and the builder must solve alignment, calibration, fume control, wiring, and laser safety. A commercial enclosed engraver may cost more, but it can reduce the amount of mechanical and safety engineering the user must perform.
Final assessment
MokeyLaser is best understood as an open-source starting point: a practical combination of extrusion, printed parts, belt motion, Arduino control, GRBL, and a diode laser module. The historical $402.61 BOM shows that the underlying hardware was intended to be accessible, but it should not be mistaken for a current price or a complete cost of safe operation.
The project becomes defensible only when the open-frame concept is treated as unfinished from a safety perspective. Build the mechanics carefully, test motion without the laser enabled, verify every electrical interface, and complete the enclosure and hazard controls before producing optical output.
Recommended Free Tools
Source note: Project facts in this overview are based on the MokeyLaserV1 repository and Hackaday’s September 14, 2022 project overview. Safety context is based on the repository warning, Arduino guidance, FDA consumer laser guidance, and OSHA laser-safety guidance. Historical component prices and product availability require rechecking before purchase.
Best Value
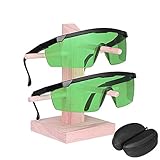
- Excellent Visibility: High Optical Densities and excellent visibility, More extensive application scenarios, ergonomic design, long-term wear without fatigue
- Eye Protection: Safety Glasses for laser exposure in industrial, military and medical applications
- Reduce Eye Pressure: laser goggles can help you filter light in other colors besides green in nature. If you feel eye fatigue from the bright or flashing laser beam, wearing glasses help relieve eye pressure
- This kit contains 2 pairs of glasses including Polycarbonate (PC) frame and Polycarbonate lens with anti-reflective coating
- Comgrow Laser Safety Glasses comes with LANYARD HOLE and ADJUSTABLE TELESCOPIC TEMPLE which enhance wearing comfort and stability
Frequently Asked Questions
What is MokeyLaser?
MokeyLaser is a documented open-source X-Y diode-laser engraver design, not a finished commercial machine. It uses 2040 V-slot extrusion, 3D-printed structural parts, GT2 belts, NEMA 17 motors, an Arduino Uno/CNC Shield controller, GRBL 1.1, and a SainSmart FL55 455 nm TTL/PWM laser module.
How much does it cost to build MokeyLaser?
The project repository lists a historical total of $402.61: $383.59 from Amazon and $19.02 from Grainger. It is not a current quote; prices, availability, shipping, taxes, and substitutions can change, and safe enclosure and extraction hardware may add substantially to the cost.
Is MokeyLaser safe to use?
Not in its original open-frame form. A laser capable of engraving or cutting can cause severe eye and skin injuries. Safe operation requires a wavelength-appropriate light-blocking enclosure, access control or interlock, emergency-stop method, warning labels, suitable extraction, and properly selected protective eyewear.
The Tool Desk
Outbyte PC Repair FREEClear out junk files and repair common Windows errorsFree Scan →Outbyte Driver Updater FREEScan for outdated or missing drivers - takes under a minuteDriver Scan →What software does MokeyLaser use?
The documented design uses GRBL 1.1 on an Arduino Uno and can work with many open-source G-code senders. The research does not establish one mandatory application or a current sender matrix for every operating system, so verify GRBL 1.1 compatibility with the software you choose.
Does MokeyLaser need air assist?
Air assist may clear smoke from the beam path and improve cutting behavior, but it is not a safety system. It does not replace an enclosure, extraction, interlocks, emergency controls, or wavelength-rated eyewear.
The Bottom Line
Bottom line: MokeyLaser is a worthwhile open-source maker project, not an “easy” ready-to-run laser engraver. Its Arduino/GRBL, extrusion, belt, and 3D-printed architecture is approachable, but safe operation requires a wavelength-rated enclosure, access interlock, emergency stop, extraction, training, and verified protective eyewear before the laser is powered.
Quick Recap

Product prices and availability are accurate as of the date/time indicated and are subject to change. Any price and availability information displayed on Amazon at the time of purchase will apply.




