The Tool Desk
What’s actually slowing this PC down?
Pick the symptom - the matching free tool is one click away.
Outbyte Driver Updater FREEFix the driver behind crashes, sound loss and screen glitchesFind Drivers →Outbyte PC Repair FREEClear out junk files and repair common Windows errorsFree Scan →
ThatPainter is reader-supported. When you buy through links on our site, we may earn an affiliate commission. Learn More
Screen printing is easiest to learn as a one-color project: create a high-contrast artwork positive, coat a mesh screen with photo emulsion, expose and wash out the design, then force ink through the open mesh with a squeegee. This beginner workflow can turn a plain laptop bag, shirt, pouch, or sheet of paper into a personalized item in roughly 2–4 hours, although drying and curing times vary by product.
This guide follows the photo-emulsion method used in the Make: Silk-Screening 101 project. It also explains the simpler pre-exposed-stencil route, which is often the better first attempt if you want to print without mixing emulsion or calibrating an exposure setup.
As an Amazon Associate I earn from qualifying purchases.
Recommended Free Tools
What you will make
The basic project is a one-color print on a laptop bag or another reasonably flat surface. The same process applies to many textiles and paper substrates, provided that you choose ink designed for that material and follow its drying or curing instructions.
- Difficulty: beginner-friendly
- Typical project time: about 2–4 hours, not counting product-specific curing or extended drying
- Design: one color with strong black-and-white contrast
- Method: photo-emulsion stencil, followed by hand printing
- Estimated original project cost: approximately $0–$50, depending on what you already own and the materials available in your region
“Silk-screening” is the older common name; modern screens usually use synthetic mesh rather than silk. The principle is unchanged: a stencil blocks some mesh openings while leaving the design openings clear. Ink is pushed across the screen and passes through only those open areas.
#1 Best Overall

- 【Complete Screen Printing Kit】3 x screen printing frame, 6 x fabric ink, 1 x 50W exposure light kit, 1 x photo emulsion kit, 1 x emulsion scoop coater, 1 x acrylic sheet, 1 x ink knife, 6 x gloves, 2 x screen printing squeegee, 2 x plastic scraper, 1 x 50ml plastic cup, 1 x masking tape, 5 x A4 size inkjet transparency film, 10 x wood mixing sticks 1 x instructions, 1 x exposure light instruction
- 【Screen Printing Exposure Light】A 50W screen printing exposure lamp with a stable lamp holder, even exposure, and long filament service life, which can effectively shorten the curing time of emulsion
- 【Ink and Photo Emulsion】Including 6 cans of 3.4fl.oz (100ml) silk screen printing ink (black, white, red, blue, yellow, green), which is suitable for cotton, polyester, blends, linen, rayon, and other synthetic materials, as well as paper and cardboard. The capacity of the photo emulsion is 140ml, with the assistance of the emulsion scoop coater, making the ink thickness uniform and flat, presenting a better screen printing effect
- 【Silk Screen Wooden Frame】Three wooden frame frames are sturdy and reusable. Measuring 14inch x 10inch, 8inch x 12inch, and 6inch x 10inch, paired with various sizes of screen printing squeegees to meet your different screen printing projects
- 【Suitable for Customization Projects】Complete silk screen kit with rich accessories, saving time and effort to purchase the necessary accessories for silk screen printing. Great for beginners or screen printing enthusiasts to DIY customize exclusive T-shirts, canvas tote bags, and vests at home
For an overview of the equipment and hazards involved in the wider process, see OSHA’s screen-printing guidance.
Choose your beginner route
There are two sensible ways to begin. They share the same printing step but differ in how the stencil is made.
| Route | What you do | Best for | Trade-off |
|---|---|---|---|
| Photo emulsion | Coat the screen, dry it in darkness, expose the artwork, and wash out the design. | Readers who want to learn the traditional photographic stencil workflow or make detailed reusable designs. | More control, but it requires careful coating, drying, exposure, and washout. |
| Pre-exposed stencil | Use a ready-made photosensitive stencil and rinse it according to the manufacturer’s instructions. | First-time printers who want to skip emulsion mixing and exposure. | Less setup, but the available stencil format and design options may be more limited. |
A documented example of the second route is Speedball’s DIY screen-printing kit, which uses reusable pre-exposed Speed Screens and does not require coating or exposing a screen. If you want to follow the photo-emulsion method in this article as closely as possible, a photo-emulsion screen-printing kit is a more direct match. Kit contents change, so verify the current list before buying: some include fabric, lamps, or a base, while others do not.
Materials and tools
For the artwork
- A simple one-color design
- Drawing materials, or a computer with image-editing software
- Transparency film or acetate suitable for your printer
- A laser printer, if you are printing the positive digitally
Your positive should be as opaque as possible. The black areas need to block the exposing light; the clear areas allow the emulsion to harden. A screen-printing transparency film can be useful, but check whether the product is made for inkjet or laser printers before purchasing.
For the screen
- A pre-stretched screen with a wood, aluminum, or similar frame
- Photo emulsion and its required sensitizer
- A coating trough or another tool recommended by the emulsion manufacturer
- A suitable exposure light or exposure setup
- Access to water for washing out the stencil
- screen tape for sealing unwanted edges or pinholes
The mesh count and exposure setup affect the result, but there is no single mesh count or exposure time that works for every emulsion, coating thickness, artwork, and lamp. Use the emulsion maker’s exposure guide and run a test exposure rather than copying a universal number from another setup.
For printing
- A squeegee sized to fit the image
- Ink made for your chosen substrate
- A flat, stable printing surface
- The laptop bag, fabric, paper, cardboard, or other item being printed
- Scrap paper for practice
- Cardboard or a board insert for fabric bags and garments
- Paper towels or rags and the cleaning materials specified by the ink manufacturer
A screen printing starter kit is usually the simplest buying path for a first project. However, read the contents carefully. “Starter kit” does not automatically mean that the package includes fabric, an exposure lamp, a press, or every chemical required for reclaiming.
1. Create artwork that exposes and prints cleanly
Start with a bold, high-contrast, one-color image. A thick-line icon, lettering, silhouette, or simple illustration is more forgiving than tiny text, hairline strokes, or a design containing many isolated details.
For the photo-emulsion process:
- Make the design solid black and white. Avoid gray unless you deliberately prepare a halftone.
- Print the design on transparent film or acetate.
- Inspect it against a light source. The black areas should look dense and opaque rather than gray or translucent.
- Size the positive to fit the screen and the item you intend to print.
Speedball’s screen-printing manual likewise emphasizes opaque, high-contrast positives. Gray artwork does not expose reliably as a continuous-tone image; it needs halftone preparation if you want to reproduce tonal variation.
Large solid areas are possible, but they may deposit more ink and create a heavier, less flexible patch on fabric. For a first textile print, a design with a good balance of lines and open space is easier to control.
2. Coat the screen with photo emulsion
Photo emulsion is light-sensitive. Work under subdued light and keep the coated screen away from direct sunlight until it has been exposed.
Windows Errors? Fix Them Before They Spread
Repair common Windows errors and clear accumulated junk for a smoother, more stable PC - no reinstall needed.Free scan · no reinstallOutdated Drivers Are Slowing You Down
One free scan finds every outdated or missing driver and matches the right update for your exact hardware.Free scan · exact hardware matchRank #2

- Screen Printing Frames: 3 different sizes of screen printing frames(10 x 14 inch, 8 x 12 inch, 6 x 10 inch) with 2 kinds of screen printing squeegees meet your different printing needs, you can enjoy your screen printing job as you like
- Screen Printing Squeegees: 2 different sizes squeegees are easy operation and offer a stable printing effect for different sizes of frames. 9.4 and 5.9 inches. The 9.4 inch squeegees can cover the entire screen, while the 5.9 inch allow for single-handed use, making them great for printing smaller pattern
- Inkjet Transparency Film: A4 size transparency film is widely applied in silk screen printing, which can help you transfer the pattern you design
- Practical Accessories: 10 pieces of wood sticks and an ink knife for smoothly mixing and transferring ink and emulsion. Masking tape is easy to peel and tear, leaving no marks upon removal, and effectively provides protection for silk screen projects
- Multiple Use: You can print patterns on T-shirts, canvas tote bags, and tank tops with this screen printing starter kit. This is a great family activity for beginners or people that’s doing it at home.
- Mix or sensitize the emulsion exactly as its label directs. Different products have different preparation, storage, and working-life requirements.
- Make sure the mesh is clean, dry, and free from grease.
- Apply an even coat of emulsion to the mesh. Avoid leaving thick ridges or thin, uncovered areas.
- Remove excess emulsion as directed by the product instructions.
- Dry the screen horizontally in darkness or under the manufacturer’s recommended low-light conditions.
- Keep the screen protected from light until exposure.
As one product-specific example, Speedball’s manual advises drying the coated screen horizontally for at least four hours and storing unused mixed emulsion in a cool, dark place. It gives an approximate refrigerated shelf life of four months for that product. Do not treat those figures as universal: your emulsion’s label takes priority.
Uneven coating is a common cause of weak stencil edges, pinholes, and inconsistent ink coverage. Excess emulsion can also change how long the screen needs to expose.
3. Expose the artwork
Place the opaque artwork positive tightly against the dry, coated screen. The exact orientation depends on whether you want the design reversed and which side of the screen will contact the substrate. Follow your emulsion or kit instructions.
When the screen is exposed, light hardens the emulsion in the areas that are not blocked by the black artwork. The black design protects its corresponding emulsion, leaving that portion soft enough to wash out.
Exposure time depends on all of the following:
- the emulsion and sensitizer
- coating thickness
- mesh and screen color
- the opacity of the artwork positive
- the lamp or sunlight source
- the distance between the light and screen
For that reason, do not rely on a universal exposure time. If your emulsion supplier provides an exposure calculator or test-strip method, use it. An underexposed screen may wash out beyond the artwork and produce a weak stencil; an overexposed screen may leave the design difficult or impossible to wash out.
4. Wash out and dry the stencil
- Rinse the screen according to the emulsion instructions, usually beginning gently.
- Concentrate water on the protected artwork areas so the soft emulsion clears from the design.
- Inspect the open mesh against the light. Every intended print area should be free of residue.
- Check for pinholes or unwanted open spots and block them with screen tape or an appropriate screen filler.
- Let the screen dry completely before printing.
Do not force water pressure high enough to damage a fragile, underexposed stencil. If the design will not open, the screen may be overexposed, the positive may not be opaque enough, or the coating may be too thick.
5. Prepare the substrate and ink
Place the bag or fabric on a flat surface. Insert a piece of cardboard inside a bag or garment to stop ink from transferring through to the opposite side. Remove lint, wrinkles, and loose debris from the print area.
Rank #3
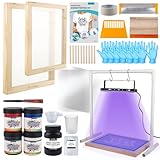
- Beginner-Friendly Starter Kit: This screen printing starter kit includes all essential tools plus a step-by-step guide, making it easy for beginners to learn and start printing with confidence right out of the box
- Efficient UV Exposure: The 50W UV exposure lamp and sturdy bracket provide strong, even lighting to speed up emulsion curing and enhance image clarity—ideal for faster, more accurate screen print results
- Vibrant & Versatile Ink Colors: This silk screen printing kit features 4 rich colors—black, white, red, and blue—that deliver bold, long-lasting prints. The inks are easy to blend, giving you full flexibility to create unique designs on a variety of fabrics
- Versatile Printing Applications:This screen printing kit lets you print your favorite designs on T-shirts, canvas bags, tablecloths, and more—perfect for DIY crafts, personalized gifts, and a wide range of fabric projects
- All-in-one package: Includes 2 screen printing frames, 1 squeegee, 1 emulsion scoop coater, 4 color inks, 1 50W UV lamp kit, 1 50ml measuring cup, 2 plastic cups, 1 ink knife, 8 gloves, 1 photo emulsion kit, 1 sensitizer, 1 plastic scraper, 1 tape, 10 A4 films, and 10 wood mixing sticks
Choose ink according to the surface:
- Fabric: use textile or fabric screen-printing ink and follow the maker’s setting instructions.
- Paper or cardboard: use an ink labeled for those materials, or confirm that the selected fabric ink is also suitable. Some fabric inks can be used on paper and cardboard, but this is product-specific.
- Dark fabric: choose opaque or high-opacity ink, especially white or light colors.
- Light fabric: transparent or semi-transparent colors may work, but the fabric color will influence the final appearance.
Many acrylic screen inks are transparent. A blue printed on a yellow bag, for example, may look different from the same blue printed on white. For dark materials, ordinary transparent ink can disappear or shift dramatically; opaque ink is the safer choice. Jacquard’s screen-printing range distinguishes semi-transparent and opaque options, including super-opaque white.
Quick wins for a faster PC:
Repair Windows errors before they cause bigger problemsFix Now →Fix the driver behind crashes, sound loss and screen glitchesFind Drivers →Do not assume that any acrylic paint or acrylic screen ink will become washable on fabric. Speedball specifically distinguishes acrylic ink from fabric ink and does not recommend its acrylic ink for washfast fabric results. Read the label for the exact product you own.
6. Make the first print
Practice on scrap paper before printing the bag. This lets you check the stencil, ink amount, screen position, and squeegee pressure without sacrificing the final item.
- Position the screen over the substrate. Use registration marks, tape hinges, or a simple screen-printing board if you need repeatable placement.
- Put a small bead of ink just above the design area.
- Hold the screen steady and make a controlled flood or print stroke, depending on the instructions for your setup.
- Pull the squeegee across the image with consistent pressure and angle. The goal is to force ink through the open mesh without flooding the stencil.
- Lift the screen carefully and vertically enough to avoid dragging the wet image.
- Inspect the print before moving the item. Note thin areas, smears, gaps, or excess ink.
Too little pressure can leave incomplete coverage. Too much pressure, a screen that shifts, or ink that is too fluid can produce blurred edges. Keep the screen and substrate flat and avoid touching the wet print.
When printing a second item, keep the print stroke consistent. If ink begins drying in the mesh, stop and clean it according to the ink manufacturer’s directions rather than forcing more pressure through a partially blocked stencil.
Free tools Windows power users keep installed
One-click scans. No signup required.
7. Set the print for washability
Let the print dry and set it exactly as the ink manufacturer specifies. “Dry to the touch” is not always the same as fully cured or washfast.
- Check whether the ink requires air drying, heat setting, or another curing method.
- Use the stated temperature, time, and equipment guidance for that product.
- Do not wash the item until the recommended setting period is complete.
- Test a small or spare print first if washability is especially important.
Different inks have different requirements, so this article intentionally does not prescribe one universal cure temperature or time.
Rank #4

- PHOTO EMULSION SCREEN PRINTING KIT - Perfect for those ready to take on the Photo Emulsion method of screen printing
- ALL-IN-ONE KIT - Not only includes all the tools and inks need, but also include the light source needed to expose screens
- NO LIGHT SAFE ENVIRONMENT NEEDED - With Speedball's Diazo Photo Emulsion and Lamp Kit (included), exposing screens at home is a breeze
- PERFECT FOR PRINTING DETAILED IMAGES - Create screens from hard-edge drawings done with black inks on acetate or digital high-contrast to opaque images printed on transparencies using a laser or inkjet print
- BRING FUN IDEAS TO LIFE - Kit includes: (1) 10”x14” Speedball Wooden Screen Frame and Base; (1) Speedball Craft Squeegee (Textile); (4) 4oz. jars of Speedball Fabric Screen Printing Ink (one each Black, Red, White, Blue); (1) 3.3oz. bottle of Speedball Diazo Photo Emulsion; (1) bottle of Speedball Sensitizer; (1) 4oz. bottle of Speedball Photo Emulsion Remover; (2) Speedball Transparencies; (1) Lamp; (1) Photoflood Bulb; (1) Lamp Clamp; (4) Craft Sticks; (1) sheet of black paper; (1) Speedball Screen Printing Instruction Guide
8. Clean the screen and reclaim it
Clean up as soon as practical. Dried ink can block mesh and make future printing more difficult.
- Remove excess ink from the screen and return it to its container if the product instructions permit.
- Rinse or clean the screen using the method specified for that ink.
- If you want to remove the stencil, apply the compatible emulsion remover and wash the screen thoroughly.
- Inspect the mesh for remaining emulsion, ink, or blocked openings.
- Dry the screen before storing it.
Water-based inks may rinse from some reusable stencil systems, but not every ink behaves the same way. Emulsion remover is used to reclaim a photo-emulsion screen, and leaving emulsion in place too long can make removal harder. Follow the labels for the specific ink, emulsion, sensitizer, and remover rather than combining chemicals based on general advice.
Do these 3 things before closing this tab:
1Fix the driver behind crashes, sound loss and screen glitches2Clear out junk files and repair common Windows errors3Scan for outdated or missing drivers - takes under a minuteIf you already own a screen and squeegee, replacement supplies such as photo emulsion and diazo sensitizer may be more economical than another complete kit. A replacement screen-printing squeegee is also a practical upgrade when the rubber edge becomes damaged or uneven.
Common problems and fixes
| Problem | Likely causes | What to check next |
|---|---|---|
| The image will not wash out. | Overexposure, an overly thick coating, or insufficiently opaque artwork. | Use the emulsion maker’s exposure test; inspect the positive and reduce coating thickness if appropriate. |
| The stencil washes away outside the design. | Underexposure, weak emulsion, or an excessively forceful washout. | Increase exposure only after testing and use gentler washout pressure. |
| The print is pale or incomplete. | Insufficient ink, uneven pressure, blocked mesh, or an unsuitable transparent ink. | Check the mesh, make a controlled stroke, and use opaque ink on dark fabric. |
| The print is blurry. | The screen moved, the substrate shifted, or pressure was inconsistent. | Secure the item and screen, then lift the screen carefully. |
| The design cracks or washes out. | The ink was wrong for the fabric or was not set according to its instructions. | Confirm that it is textile ink and follow the complete curing guidance. |
| Ink dries in the mesh. | The screen was left idle, the work area is too warm or dry, or the ink requires different handling. | Clean promptly and follow the ink’s open-time and cleanup instructions. |
Safety and workspace setup
Read the labels and safety data for every ink, emulsion, sensitizer, and remover before use. Work in a ventilated area when the product requires it, wear appropriate gloves and eye protection, and follow the product’s disposal instructions. Jacquard’s photo-emulsion instructions specifically warn about ventilation and skin or eye contact and recommend protective gloves.
Keep light-sensitive emulsion away from direct sunlight, protect clothing and work surfaces from ink, and do not pour chemical waste down a drain unless the label and local rules allow it. A home craft setup is suitable for learning, but it is not the same as a production print shop. Commercial shops may use measured screen tension, dedicated exposure units, washout booths, presses, flash dryers, conveyor dryers, and stronger reclaiming controls.
What to buy: three sensible setups
Lowest-complexity setup
Choose a pre-exposed screen-printing kit if your priority is printing quickly. Confirm that it includes a screen or stencil, squeegee, suitable ink, and instructions. You may still need the item to print, a flat work surface, cardboard, cleaning supplies, and protective equipment.
Closest match to this tutorial
Choose a photo-emulsion kit if you want to learn the full process. Jacquard’s documented kit includes a 10-by-14-inch pre-stretched aluminum-frame screen, squeegee, screen inks, photo emulsion, diazo sensitizer, acetate sheets, a stir stick, and instructions; fabric is supplied separately. Contents and availability can change.
More complete exposure setup
An advanced all-in-one kit can make the exposure stage more repeatable. Speedball’s catalog has listed a 10-by-14-inch screen and base, squeegee, fabric inks, diazo emulsion and sensitizer, emulsion remover, transparencies, a 30W LED exposure lamp, and instructions in one configuration. Treat the lamp and other included components as configuration-specific rather than guaranteed features of every kit.
Buying an exposure unit, press, flash dryer, or conveyor dryer is not necessary for a first hand-printed bag. Those are upgrades for repeatability, throughput, or production work.
Optional: turn the process into digital content
Screen printing is visually useful on camera: artwork preparation, stencil washout, the first pull, and the reveal all make good short demonstrations. If you publish a recorded studio tour, class preview, or rights-cleared process video, a service such as cloud livestreaming for recorded demonstrations may be relevant for keeping an educational stream available. It is not needed to learn screen printing or improve the physical print, and current plans and availability should be checked before purchase.
What’s actually slowing this PC down?
Pick the symptom - the matching free tool is one click away.
Best Value

- Value kit: The screen printing kit is equipped with the necessary tools needed for screen printing and comes with a detailed operating guide, so even beginners can get started quickly
- Faster exposure: The 50W UV exposure lamp and metal bracket accelerate the curing time of photo emulsion and improve the image display efficiency
- Multiple colors: The set contains six colors: black, white, red, blue, yellow, and green, providing more color choices, and you can blend your favorite colors according to your needs
- Wide range of uses: You can print your favorite patterns on T-shirts, canvas bags, tablecloths and other fabrics to create your own handicrafts
- All-in-one package: The kit contains various tools and materials needed for screen printing: 3 Screen Printing Frames,1 Screen Printing Squeegee,1 Emulsion Scoop Coater,6 Color Inks,1 50W UV Lamp Kit,1 50ml Measuring Cup,2 Plastic Cups,1 Ink Knife,8 Gloves,1 Photo Emulsion Kit,1 Sensitizer,1 Plastic Scraper,1 Tape,15 A4 size films,10 Wood Mixing Stick
Keep a screen-printing demonstration live on YouTube
StreamNeo is a fit for creators who want to turn an owned or licensed screen-printing demonstration into an always-on YouTube Live stream without leaving a PC or encoder running. Upload the video and paste a YouTube stream key; the stream runs in the cloud while your computer stays off.
For a recorded studio tour, class preview, or process replay, StreamNeo checks stream health every 30 seconds and restarts dropped streams automatically. That keeps a companion broadcast available after the physical print is finished, rather than requiring the craft setup to be run continuously.
Start with the free 24-hour 720p/30fps trial, with no card required at signup. Confirm that you have rights to the recording, then use the trial to test the YouTube Live workflow before choosing a longer-running setup.
Should you use a computer-maintenance tool?
No software is required for the craft itself. If you draw by hand and use a local print shop for transparencies, you may not need a computer at all. Windows users who scan artwork, prepare high-contrast files, or edit tutorial video can troubleshoot general computer performance or driver problems separately, but those tools do not replace correct printer settings, opaque artwork, suitable transparency film, or proper emulsion exposure.
The Tool Desk
Outbyte Driver Updater FREEScan for outdated or missing drivers - takes under a minuteDriver Scan →Outbyte PC Repair FREEClear out junk files and repair common Windows errorsFree Scan →Practical checklist before the first print
- Choose a simple, bold, one-color design.
- Confirm that the positive is opaque and high contrast.
- Check whether your transparency film matches your printer.
- Decide between a pre-exposed stencil and photo emulsion.
- Read the manufacturer’s instructions for coating, exposure, washout, ink, curing, and cleanup.
- Prepare a dark, low-light drying area for coated emulsion.
- Use fabric ink for washable textile prints.
- Use opaque ink for dark substrates when necessary.
- Practice the squeegee stroke on paper.
- Insert cardboard behind a bag or garment.
- Wear appropriate gloves and eye protection and provide ventilation where required.
- Clean the screen before ink dries.
Frequently Asked Questions
Is screen printing the same as silk-screening?
They generally refer to the same stencil-based printing process. The name silk-screening comes from silk mesh, although modern screens commonly use synthetic mesh.
Can a beginner screen-print without an exposure lamp?
Yes, if you use a pre-exposed stencil kit or a process designed for another light source. If you use photo emulsion, follow the emulsion maker’s exposure instructions; exposure time depends on the product, coating, artwork, lamp, and distance.
Can I use acrylic paint on a shirt?
Do not assume it will be washable. Use ink labeled for fabric and follow its setting instructions. Some acrylic screen inks are not recommended for washfast fabric printing.
Why does my color look different on dark fabric?
Many screen-printing inks are transparent or semi-transparent, so the substrate color influences the result. Use opaque or high-opacity ink, including opaque white when appropriate, on dark materials.
Quick wins for a faster PC:
Clear out junk files and repair common Windows errorsFree Scan →Scan for outdated or missing drivers - takes under a minuteDriver Scan →Repair Windows errors before they cause bigger problemsFix Now →Do I need a screen-printing press?
No. A stable flat surface and careful hand printing are enough for a small beginner project. A press becomes useful when you need repeatable registration, multiple colors, or higher production volume.
The Bottom Line
For the most approachable first print, use a simple high-contrast design, a pre-exposed stencil, and properly labeled fabric ink. For the fullest silk-screening lesson, coat and expose your own screen with photo emulsion, but calibrate exposure to your exact materials rather than using a universal time. Practice on paper, use opaque ink on dark fabric, cure the print as directed, and clean the screen before ink or emulsion becomes difficult to remove.
Quick Recap

Product prices and availability are accurate as of the date/time indicated and are subject to change. Any price and availability information displayed on Amazon at the time of purchase will apply.




