ThatPainter is reader-supported. When you buy through links on our site, we may earn an affiliate commission. Learn More
The best way to hang a picture is to treat the frame, wall, furniture, and hardware as one system—not to drive a nail at a guessed height. On an open wall, a useful starting point is to place the center of the artwork about 57–58 inches above the floor. Then adjust for sofas, consoles, beds, stairs, seated viewers, and the size of the room. Mock up the arrangement first, measure from the frame’s actual hanging point, choose hardware rated for both the wall and the artwork, and finish by leveling and inspecting the installation.
As an Amazon Associate I earn from qualifying purchases.
The familiar “57-inch rule” is a starting point, not a universal law. Exhibition spaces establish their own consistent eye-level lines—guidance ranges from about 57 inches to 60 inches—because viewing conditions and local standards vary. What matters most at home is a deliberate, repeatable relationship between the artwork and the people or furniture around it.
Do these 3 things before closing this tab:
1Clear out junk files and repair common Windows errors2Fix the driver behind crashes, sound loss and screen glitches3Repair Windows errors before they cause bigger problems1. Start with the center of the artwork
For a single picture on an open wall, measure for the center of the artwork or frame, not its top edge. Aim for approximately 57–58 inches from the floor to the center as a practical adult eye-level starting point.
#1 Best Overall

- EFFORTLESS ORGANIZATION: Our 303pcs Heavy Duty Picture Hanging Kit boasts an exceptional design with categorized compartments, saving you precious time that would otherwise be spent searching for the right hardware. Plus, when you're done using it, everything neatly tucks away, eliminating any post-project mess. Can replace picture hanging strips.
- TAILORED WEIGHT OPTIONS: Say goodbye to one-size-fits-all solutions! Our Heavy Duty Picture Hangers come with a variety of weight options (10LB, 20LB, 30LB, 45LB, 75LB), ensuring that whatever the size of your frame, we've got the perfect match to tackle your hanging needs. Various accessories help you decor your walls in bathroom, living room, bedroom.
- UNCOMPROMISING DURABILITY: Crafted from high-strength steel, our Heavy Duty Picture Hanging Kit guarantees not only longevity but also exceptional stability and security once your artwork is on the wall. Your frames will stay right where you want them, worry-free.
- VERSATILE HARDWARE ASSORTMENT: Experience the convenience of choice with our Wall Hanging Kit. Packed with a rich assortment of hardware, including Heavy Duty Wall Hooks, Sawtooth hangers, Picture Wire, D Rings, Hardware Nails, and Eye Hooks, you'll have all the options you need for various hanging projects, tailored to your preferences. Can replace picture hanging strips.
- NEATLY PACKAGED DELIGHT: When you choose us, you're not just getting hardware; you're getting an elegantly organized experience. Every Heavy Duty Wall Hook, Sawtooth, Picture Wire, D Ring, Hardware Nail, and Eye Hook is neatly arranged in a stylish plastic container. It's not just about hanging art; it's about adding a touch of sophistication to your entire hanging process.
This height works because people generally read the artwork at eye level rather than from the ceiling down. It also creates a consistent visual line when several unrelated pictures are displayed in the same room. Professional exhibition guidance often uses a similar center-line approach, but there is no single museum height that governs every home, gallery, or viewing situation.
How to calculate the target top edge
If you are hanging a 30-inch-tall frame and choose a 57-inch center line:
- Divide the frame height by two: 30 ÷ 2 = 15 inches.
- Subtract that half-height from the desired center: 57 − 15 = 42 inches.
- The top of the frame should therefore be about 42 inches above the floor.
That calculation only locates the frame. The wall fastener may need to go higher because the hanging wire, D-rings, or sawtooth hanger sits below the frame’s top edge. Measure that hardware drop rather than guessing.
For a gallery wall, measure the whole composition
A gallery wall behaves visually like one large piece. Do not place every frame independently at 57 inches, which can produce a scattered arrangement. Instead, determine the outside edges of the complete grouping, find its visual center, and position that center near your chosen eye-level line.
The center of the composition is not necessarily the center of the largest frame. A tall frame on one side, a heavy dark frame, or a large gap can shift the grouping’s visual balance. Paper templates make this easier to judge before you drill.
2. Let furniture override the general rule
When artwork hangs above a sofa, console, headboard, mantel, or other furnishing, the relationship between the art and the furniture usually matters more than a strict 57-inch center height. Art that is technically at eye level can still look disconnected if it floats several inches above the piece below it.
As a practical starting point, try:
- Above a sofa: roughly 6–8 inches between the top of the sofa back and the bottom of the frame or grouping.
- Above a console: roughly 4–8 inches between the console surface and the artwork.
These are design guidelines, not building requirements. Measure the actual furniture, frame, and sightlines. A tall sofa back, a deep frame, unusually low seating, or a room primarily viewed while seated may justify a different gap.
Quick wins for a faster PC:
Clear out junk files and repair common Windows errorsFree Scan →Scan for outdated or missing drivers - takes under a minuteDriver Scan →Repair Windows errors before they cause bigger problemsFix Now →Rank #2

- Wide Assortment: 220-piece picture hanging kit includes 24 sets of 10lb picture hangers, 14 sets of 30lb picture hangers, 4 sets of 50lb picture hangers, 3 sets of 100lb picture hangers, 2 sets of 80lb, and 2 sets of 120lb picture hangers, 8 sets of D-rings, steel wire, screw eye hooks, and sawtooth hangers
- Durable Construction: Crafted from high-quality steel
- Convenience: Organizational storage case included
- Complete picture hanging kit with galvanized wire and sawtooth hangers, supports 10lb-120lb of wall décor and art
Center the single picture or grouping over the furniture, and consider the visual width as well as the height. A small picture stranded over a wide sofa often looks accidental; a very wide arrangement pressed into a narrow console can feel crowded. Use the furniture as the visual boundary, but leave enough breathing room at both ends.
Over a bed or seating area, security deserves extra attention. A heavy or valuable frame should be installed with properly rated mechanical hardware—not a convenience adhesive chosen only because it avoids holes.
3. Mock up every arrangement before making holes
Templates are one of the simplest ways to improve a picture-hanging result. They let you assess height, width, spacing, furniture relationships, door swings, windows, light switches, and walking paths before the wall is damaged.
- Measure each frame’s width and height.
- Cut paper or cardboard templates to those exact dimensions.
- Mark the top of each frame and, if useful, mark its hardware location on the template.
- Tape the templates to the wall with painter’s tape.
- Step back from several viewing positions and rearrange them until the outside edges and visual weight feel balanced.
- Only then transfer the fastener locations to the wall.
For a gallery wall, choose a spacing rule and repeat it. There is no universal gap that works for every composition, but inconsistent gaps usually look less intentional than either a tight or generous arrangement. A useful starting point is about 2–3 inches between frames. Small frames often need tighter spacing; large frames can tolerate wider gaps.
Use a level during the template stage and again after installation. Templates are for composition; they do not eliminate the need to account for the actual hanging hardware.
4. Match the hanger to the wall, weight, and frame
The right fastener depends on three things:
- The wall: drywall, plaster, brick, concrete, or another surface.
- The load: the actual weight of the framed artwork, not a rough visual estimate.
- The frame hardware: sawtooth hanger, D-rings, wire, cleat, or a manufacturer-specific system.
When possible, attach heavy artwork to a wall stud. If there is no suitable stud, use an anchor specifically rated for the load and wall construction, and install it exactly as directed. A package rating is not universal: it can depend on the anchor type, the number of fasteners, the condition and thickness of the wall, and whether the fastener is installed in a stud.
Common hardware choices
- Sawtooth hangers: convenient for lighter frames and simple installations. They are not automatically appropriate for a large or heavy frame.
- D-rings with two wall fasteners: a stable choice when you want accurate leveling and less side-to-side rotation.
- Picture wire: flexible and easy to position, but the wire, frame attachment points, and wall fastener all need to support the load.
- Drywall anchors: useful when no stud is available, provided the exact anchor is rated for the artwork and installed in sound drywall.
- Masonry screws or anchors: required for brick, concrete, and similar masonry. Use the appropriate masonry bit and follow the fastener instructions.
- Track-and-cable systems: practical for galleries, offices, rentals, or collections that change frequently. These are specialized systems, not a necessary upgrade for every household picture.
For a standard DIY installation, a picture hanging kit can consolidate common D-rings, wire, hooks, and anchors. Treat the kit as a collection of components, not a guarantee that every included fastener suits every frame or wall. Check each component’s instructions and load rating before using it.
5. Use two secure points for large frames
Large pictures typically benefit from two wall fastening points. Two points reduce rotation, distribute the load more reliably, and make it easier to keep the frame level. They do not, however, compensate for an underrated anchor, weak drywall, damaged plaster, or hardware that is pulling out of the frame.
Free tools Windows power users keep installed
One-click scans. No signup required.
Rank #3
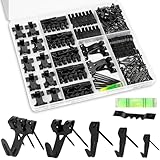
- EFFORTLESS ORGANIZATION: Our 385pcs Heavy Duty Picture Hanging Kit boasts an exceptional design with categorized compartments, saving you precious time that would otherwise be spent searching for the right hardware. Plus, when you're done using it, everything neatly tucks away, eliminating any post-project mess. Can replace picture hanging strips.
- TAILORED WEIGHT OPTIONS: Say goodbye to one-size-fits-all solutions! Our Heavy Duty Picture Hangers come with a variety of weight options (10LB, 20LB, 30LB, 45LB, 75LB), ensuring that whatever the size of your frame, we've got the perfect match to tackle your hanging needs. Various accessories help you decor your walls in bathroom, living room, bedroom.
- UNCOMPROMISING DURABILITY: Crafted from high-strength steel, our Heavy Duty Picture Hanging Kit guarantees not only longevity but also exceptional stability and security once your artwork is on the wall. Your frames will stay right where you want them, worry-free.
- VERSATILE HARDWARE ASSORTMENT: Experience the convenience of choice with our Wall Hanging Kit. Packed with a rich assortment of hardware, including heavy duty picture hangers, Sawtooth hangers, Hardware Nails, you'll have all the options you need for various hanging projects, tailored to your preferences.
- NEATLY PACKAGED DELIGHT: When you choose us, you're not just getting hardware; you're getting an elegantly organized experience. Every Heavy Duty Wall Hook, Sawtooth, Hardware Nail, is neatly arranged in a stylish plastic container. It's not just about hanging art; it's about adding a touch of sophistication to your entire hanging process.
How to transfer two D-rings to the wall
- Measure the horizontal distance between the actual hanging points on the back of the frame.
- Measure the vertical distance from those points to the top edge of the frame.
- Transfer both measurements to your wall template or pencil marks.
- Check the marks with a level before drilling or installing anchors.
- Install both fasteners, hang the frame, and check that both points are fully seated.
If the frame uses wire, avoid assuming that one central nail is sufficient simply because the wire can hang from it. For a large frame, two hooks can provide better stability when the frame and hanging method support that arrangement.
For valuable, fragile, unusually heavy, or oversized artwork, use a properly specified cleat, track system, or professional installation rather than improvising with a generic nail. The consequences of a fall include injury, damage to the artwork, and damage to the wall. Exhibition settings commonly require secure wire, cleats, multiple rods, or weight-specific systems for heavier work.
6. Level the frame, protect the wall, and inspect it
Once the frame is on the wall, place a level along its top edge or another straight reference point. A frame can look level from one angle and be visibly crooked from across the room, so check it from the main viewing positions too.
For wire-hung frames, two hooks can help prevent swinging and rotation. If the frame leans forward, small felt pads on the lower rear corners can protect the wall and bring the frame closer to vertical. Make sure the pads do not create an unstable point or interfere with secure seating on the fastener.
Recommended Free Tools
Before considering the job finished, inspect:
- that every wall fastener is fully seated;
- that an anchor has not spun, loosened, or pulled away from the wall;
- that the frame hardware is firmly attached to the frame;
- that wire is not frayed, stretched, or slipping from its hardware;
- that the artwork is not resting against an unstable edge, switch plate, lamp, or other vulnerable object; and
- that the frame remains level after you release it.
How to measure the exact fastener location
Measuring to the top of the frame is one of the most common causes of a misplaced nail. Use this method instead:
- Measure the frame height. Record the outside height of the frame, not just the artwork inside it.
- Find the hanging point. For a D-ring or sawtooth hanger, measure from the actual point that rests on the wall fastener. For picture wire, pull the wire taut and measure from the top edge of the frame to the top of the taut wire.
- Choose the center height. For an open wall, begin around 57–58 inches from the floor. For art over furniture, choose the furniture relationship first.
- Calculate the top edge. Desired center height minus half the frame height equals the target top-edge height.
- Add the hardware drop. Measure downward from the top edge to the hanging point, then add that distance to the target top-edge height. The result is the height of the wall fastener.
- Transfer both points when needed. With two D-rings or hooks, transfer the horizontal spacing and vertical drop accurately rather than estimating one side.
- Install, hang, and level. Recheck the frame after it is carrying its actual load.
Example: Suppose a frame is 24 inches high, its center should be 57 inches above the floor, and its wire sits 2 inches below the top when pulled taut. The target top edge is 57 − 12 = 45 inches. The fastener goes at 45 + 2 = 47 inches above the floor.
Which hanger should I use?
| Situation | Reasonable starting choice | Important qualification |
|---|---|---|
| Light frame on sound drywall | Appropriately rated picture hook or sawtooth-compatible hanger | Confirm the frame weight and the product rating. |
| Medium frame with D-rings | Two compatible wall fasteners | Use the exact spacing and install anchors as directed if no stud is available. |
| Heavy frame on drywall | Stud-mounted hardware or a qualifying heavy-duty drywall hanger | Wall condition, product model, and load rating control the decision. |
| Brick or concrete | Masonry-rated screw or anchor | Use the correct masonry bit and follow the manufacturer’s installation method. |
| Frequently changed collection | Track-and-cable or cleat system | Useful for flexibility, but select a system rated for the artwork and location. |
| Valuable, fragile, oversized, or unusually heavy artwork | Specified cleat, track, or professional installation | Do not substitute generic hardware or adhesive strips without verified suitability. |
Are adhesive picture-hanging strips safe?
Adhesive strips can be useful when the frame is within the exact product limits and the wall is a qualifying smooth surface. Current 3M information for Command picture hanging strips lists suitable surfaces such as painted walls, metal, painted concrete, laminate, finished wood, tile, and glass, while excluding wallpaper, fabric, textured walls, brick, and rough surfaces.
Product limits vary. For example, one narrow-strip product specifies four pairs—eight strips—for frames up to 10 pounds and up to 18 by 24 inches. 3M also describes separate products and limits, including Command strips for some frames up to 20 pounds and CLAW drywall picture hangers for items up to 65 pounds. Those figures apply only to the identified product and installation conditions. They are not permission to exceed a package rating or transfer one product’s limit to another.
Crashes, No Sound, or Screen Glitches?
Random freezes, missing sound and display glitches usually trace back to one bad driver. Find and replace yours safely.Free scan · under a minuteWindows Errors? Fix Them Before They Spread
Repair common Windows errors and clear accumulated junk for a smoother, more stable PC - no reinstall needed.Free scan · no reinstallRank #4

- THE ORIGINAL GO HANG IT! Easy picture hanging with zero measuring required. Our patented positioning system marks your nail holes accurately on the first try, so you're not guessing, patching drywall, or rehanging crooked frames. Works with sawtooth, wire, and D-ring picture hangers.
- INNOVATIVE MAGNETIC KEY SYSTEM. Our patented MagneKeys stay securely in the tool until you need them. When you're ready to hang, insert a key into the hanger on the back of your frame, hold the frame where you want it on the wall, and press. The key marks exactly where your nail goes. Works with our single-notch precision hangers, sawtooth hangers, and D-hooks. For wire hanger frames, built-in positioning hooks let you mark your nail placement just as easily.
- BUILT-IN LEVEL FOR A STRAIGHT HANG. No need to dig through your toolbox for a separate level. The detachable level is built right in, so you can make sure every frame is perfectly straight before a single nail goes in the wall. It's especially helpful for frames with multiple hanging points and for getting that perfect gallery wall where every piece lines up.
- COMPLETE 85-PIECE HARDWARE KIT. Includes 2 Single-Notch Precision Hangers, 24 self-tapping screws, picture hooks rated at 10, 20, and 30 lbs, 6 D-hooks, 8 ft of hanging wire, 20 nails, and a storage case to keep it all together. Invented in the USA.
- PERFECT GIFT FOR EVERY OCCASION. Whether it's weddings, housewarmings, graduations, or for the DIY enthusiast in your life, Go Hang It! is the must-have tool and gift for anyone who hangs pictures. It extends to fit everything from small photo frames to large wall art, so one kit handles a whole house worth of hanging.
If your wall and frame qualify, Command picture hanging strips may suit a renter or someone hanging a lightweight-to-moderate frame without drilling. Follow the package instructions for surface preparation, temperature, wait time after painting, weight, frame size, and removal. Do not use them on excluded surfaces, and do not hang valuable or irreplaceable artwork with a system whose manufacturer warns against that use. In particular, avoid treating adhesive strips as a universal solution above beds or other places where a falling frame could injure someone.
A qualifying heavy-duty drywall option such as a 3M CLAW drywall picture hanger is a mechanical hanger, not an adhesive strip. It may be suitable for particular drywall installations, but it still depends on the exact model, wall condition, artwork weight, and installation instructions. It is not a replacement for a stud, cleat, or professional installation in every situation.
Independent reader supportYour contribution helps us test, update, and keep practical guides available for everyone.Wall-specific and room-specific cautions
Drywall
Use a stud where practical for heavy pieces. Otherwise select an anchor rated for the artwork and install it in sound drywall according to its instructions. Do not assume that a hollow-wall anchor has the same capacity as a stud-mounted fastener.
Plaster
Plaster can crack when struck or loaded improperly. If drilling is appropriate, placing tape over the spot and drilling a pilot hole can help reduce surface damage. Choose hardware compatible with the plaster and the structure behind it; a superficial nail may not provide a reliable installation.
Masonry
Brick and concrete require masonry-rated fasteners and an appropriate masonry bit. Do not use an ordinary drywall anchor simply because it is convenient.
Freshly painted walls and rentals
Adhesive systems may be attractive, but verify the surface, curing time, temperature, frame size, weight, and removal method first. Fresh paint that has not cured adequately can fail or be damaged during removal.
Stairs
Stair walls are a special case. Align the composition with the geometry of the stairs and the line of travel rather than forcing every frame onto a room-wide horizontal center line. Templates are particularly valuable because you can judge the arrangement while standing at the bottom, middle, and top of the staircase.
A practical picture-hanging checklist
For a typical DIY project, gather only what the installation requires:
The Tool Desk
Outbyte PC Repair FREEClear out junk files and repair common Windows errorsFree Scan →Outbyte Driver Updater FREEScan for outdated or missing drivers - takes under a minuteDriver Scan →Best Value

- Perfect Picture Hanging Kits: 310Pcs Accessories Including Wire, Hooks, Nails, etc. In A Hardware Box
- Essential Hardware Kit Picture Hanging Kit, Ideal For Home Projects And Decorative Items
- Helpful For You To Hang Up Pictures, Photos, Posters, Framed Maps, Framed Postcards, Paintings In Home, Office, Workplace, Or Anywhere You Need To Hang Artwork
- Heavy Duty Picture Hanger Hooks Are Rated At 10lb, 20lb, 30lb, 50lb, 100lbs. They Are Matched Perfectly With The Nails In The Box, Making It Easy To Hang Pictures Of Different Sizes On The Wall.
- Packaged In A Safe, And Hard Box For Easy Storage
- paper or cardboard for templates;
- painter’s tape;
- tape measure or ruler;
- pencil;
- level;
- stud finder if a stud may be needed;
- the appropriate hooks, D-rings, wire, anchors, screws, or cleat;
- drill and the correct bit for the wall, if required; and
- felt pads for a frame that needs protection or minor stabilization.
A picture hanging kit can be convenient for common frames, while a stud finder and long level are useful for accurate DIY work, especially with heavy art or a large gallery wall. Always verify the included hardware instead of assuming the kit is suitable for your particular wall.
Common mistakes that make pictures look wrong—or fall
- Measuring to the top of the frame instead of the center or actual hanging point.
- Hanging art too high because the wall is tall or because the top edge is aligned with the ceiling.
- Treating a gallery wall as unrelated individual pieces instead of one composition.
- Using visibly inconsistent gaps between frames.
- Choosing a fastener by convenience rather than by wall type and load rating.
- Assuming adhesive strips work on textured, rough, wallpapered, or fabric surfaces.
- Using one hanging point for a large frame that needs better stability.
- Skipping the paper template and level checks.
- Applying one product’s maximum load to another product, wall, or installation method.
- Using damage-free hardware for valuable or irreplaceable artwork despite the manufacturer’s warning.
When to call a professional
Professional art installation or custom framing is sensible for valuable, fragile, oversized, unusually heavy, or awkwardly located artwork. It is also worth considering when the wall requires a cleat or track system, when studs do not align with the intended position, or when the installation is above a bed or high-traffic seating area. A qualified installer can assess the wall, frame construction, load path, and appropriate hardware instead of relying on a generic rating.
Frequently Asked Questions
What is the ideal height for hanging a picture?
On an open wall, start with the center of the artwork about 57–58 inches above the floor. Adjust that height when the picture hangs over furniture, stairs, a bed, or a space primarily viewed while seated.
How far above a sofa should a picture hang?
A useful starting point is about 6–8 inches between the sofa back and the bottom of the frame or grouping. Center the artwork over the sofa and adjust based on the actual furniture, frame size, and sightlines.
Should a gallery wall be centered at 57 inches?
Center the entire gallery-wall composition—not each individual frame—around the chosen eye-level line, often approximately 57–58 inches. Furniture and room geometry may justify a different height.
Can I hang a heavy picture with adhesive strips?
Only if the exact product, frame size, weight, wall surface, temperature, and installation conditions meet the manufacturer’s limits. Adhesive strips are not a universal choice for heavy, valuable, irreplaceable, or safety-sensitive artwork.
Do large pictures need two hooks?
Large frames typically benefit from two secure fastening points because they rotate less and are easier to level. The points still need correctly rated hardware and a sound connection to the wall and frame.
The Bottom Line
For the most professional result, place the center of open-wall art around 57–58 inches, let furniture and viewing conditions modify that height, mock up the composition with paper templates, and measure from the actual hanging hardware. Then use wall- and weight-rated hardware—often two secure points for large frames—and finish with a level and a safety inspection. The right height makes the picture look intentional; the right hardware keeps it there.
What’s actually slowing this PC down?
Pick the symptom - the matching free tool is one click away.
Quick Recap

Product prices and availability are accurate as of the date/time indicated and are subject to change. Any price and availability information displayed on Amazon at the time of purchase will apply.




