What’s actually slowing this PC down?
Outdated Drivers Are Slowing You Down
One free scan finds every outdated or missing driver and matches the right update for your exact hardware.Free scan · exact hardware matchPC Slower Than It Used to Be?
A free scan shows the junk files, broken settings and background clutter dragging Windows down - then fixes them in one click.Free scan · Windows 10 & 11Pick the symptom - the matching free tool is one click away.
ThatPainter is reader-supported. When you buy through links on our site, we may earn an affiliate commission. Learn More


The rule of thirds is a composition aid, not a law. Imagine your camera frame divided by two evenly spaced horizontal lines and two evenly spaced vertical lines. Place an important subject, horizon, or visual feature on or near one of those lines or their four intersections, then use the remaining space deliberately.
This simple overlay can help you avoid accidental centering, give a person or animal room to look or move, and balance a landscape’s sky against its foreground. But a centered portrait, symmetrical reflection, strong architectural axis, or frame-filling close-up may be better. The goal is not to obey the grid; it is to make placement and empty space intentional.
#1 Best Overall
What the rule of thirds means
Divide the image into nine equal rectangles using four imaginary lines:
- Two vertical lines at roughly one-third and two-thirds of the frame’s width
- Two horizontal lines at roughly one-third and two-thirds of the frame’s height
The lines create four intersections. These intersections and the nearby areas are useful places for important visual information: a person’s eye, an animal’s head, a building, a tree, a boat, or a bright patch of light.
The subject does not have to sit precisely on an intersection. In real photography, a nearby position is usually enough. Nikon describes the rule as a framing guide rather than a mechanical requirement, while Adobe connects it with balancing a subject against negative space.
Its practical benefit is that it interrupts two common defaults: putting every subject in the middle and placing every horizon halfway between the top and bottom of the frame. Off-center placement can give a photograph direction, breathing room, and visual movement while still feeling balanced.
The Tool Desk
Outbyte Driver Updater FREEScan for outdated or missing drivers - takes under a minuteDriver Scan →Outbyte PC Repair FREEClear out junk files and repair common Windows errorsFree Scan →How to use the rule of thirds
1. Decide what the photograph is about
Do not begin with the grid. Begin with the subject. Ask what the viewer should notice first.
- In a portrait, it may be the nearer eye, expression, or gesture.
- In wildlife photography, it may be the animal’s eye or head rather than its entire body.
- In a landscape, it may be a mountain, tree, person, boat, building, or area of light.
- In street photography, it may be a person, gesture, relationship, or approaching event.
The grid cannot decide the visual subject for you. It only helps you position that subject after you have identified it.
2. Put the main focal point near an intersection
Move your camera, your body, or your crop so the most important point sits near one of the four intersections. For a portrait, that point might be an eye near an upper intersection. For an animal, it might be the head. For a landscape, it could be a distinctive tree or structure near a lower intersection.
Think of the intersection as a useful neighborhood, not a target that must be hit exactly. A subject can extend across a line or occupy more than one third. What matters is the relationship between its most important detail and the rest of the frame.
3. Leave space in front of a gaze or movement
If a person, animal, vehicle, or athlete is looking or moving toward one side, generally leave more open space in that direction. This is sometimes called looking room or lead room.
For example, place a runner toward the left third while leaving space to the right if the runner is moving right. Place a person’s face toward the left side of the frame if they are looking into the open area on that side.
Rank #2
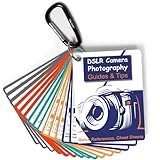
- Must-Have Camera Accessories for Photography: Includes 30 pages of the most useful photography tips, these 16 double-sided DSLR cheat sheets are color-coded. Suitable for any camera model, Canon, Nikon, Sony, etc.
- Photography Tips at Your Fingertips: Covers all the information you need when shooting! Concise and easy to understand. These Canon Rebel T7 accessories include Exposure, Shooting Modes, Composition, Lighting, and more
- Pocket-sized Photography Guides: Measures 3×4 in, this photography accessories for Canon is compact & highly portable. Easy to fit in a pocket or clip to the camera bag. Makes great photography gifts for photographers
- Great for Beginners & Advanced Users: Covers the most common shooting situations with specific instructions on how to capture fabulous photos, like fireworks, sunrise, sunset, portraits, waterfalls, etc.
- No More Overwhelming Manual & Complicated Lingo: Comes with a metal carabiner and a sturdy keyring, these Nikon d7500 d3200 d3300 accessories would be the ultimate photography props for you to carry around
Putting the subject’s face or motion directly against the edge can create a deliberate feeling of confinement or tension. If that is not your intention, turn the camera or reframe before taking the picture. Nikon specifically notes the difference between a subject facing into the image and one facing out of it.
4. Use the horizontal lines to place horizons
Place the horizon near the upper or lower horizontal third rather than automatically cutting the image in half.
Do these 3 things before closing this tab:
1Scan for outdated or missing drivers - takes under a minute2Repair Windows errors before they cause bigger problems3Fix the driver behind crashes, sound loss and screen glitches- Sky-dominant scene: Put the horizon near the lower third when the sky, clouds, or sunset is the main subject.
- Land- or foreground-dominant scene: Put the horizon near the upper third when the terrain, water texture, people, or foreground detail matters most.
- Reflection or symmetry: A centered horizon can be the right choice when the mirror-like balance is the main point.
Do not force a horizon onto a third if doing so cuts through an important feature or weakens the scene. The grid is useful only when it supports the photograph’s subject and structure.
5. Make negative space purposeful
Negative space is the relatively quiet area around a subject: open sky, calm water, a plain wall, pavement, or a softly blurred background. It is not automatically wasted space. It can isolate the subject, show scale, suggest solitude, provide visual calm, or give the eye somewhere to travel.
Before leaving a large area empty, check what is actually in it. A clean sky can support a portrait or bird. A distracting sign, bright highlight, or stray branch can compete with the subject even if it occupies only a small part of the frame.
Use the open side to answer a visual question: Where is the subject looking? Where is it going? What is it approaching? What makes the subject feel isolated or connected to its environment?
6. Keep horizons and verticals level
A grid can do more than position subjects. Its lines help you straighten a horizon and check whether buildings, poles, and other vertical elements are unintentionally leaning.
On an iPhone, open Settings > Camera, then turn on Grid and Level. Camera menus vary, but interchangeable-lens and compact cameras commonly use labels such as Viewfinder Display, Live View Display, Grid Display, or Framing Grid. Consult the manual if the option is not obvious.
The grid is only an on-screen guide. It does not appear in the captured photograph.
Examples by subject
Portraits
For a conventional environmental or head-and-shoulders portrait, place the nearer eye near an upper intersection and leave space in the direction the person is facing. This can keep the face from feeling pinned to an edge while allowing the surroundings to contribute context.
Free tools Windows power users keep installed
One-click scans. No signup required.
Do not sacrifice expression, eye contact, gesture, or flattering light just to reach an intersection. In a tightly cropped portrait, the emotional relationship between the face and the frame edges may matter more than the grid. A centered portrait can be strong when the subject’s presence, symmetry, or direct eye contact is the intended effect.
Landscapes
Start by deciding whether the sky or the ground is more important. Set the horizon near the lower third for a dramatic sky, or near the upper third for a detailed foreground. Then look for a secondary anchor—such as a tree, person, boat, rock, or building—and place it near an intersection.
A landscape with only a horizon and no foreground subject can still work, but an anchor often gives the viewer a place to enter the scene and a sense of scale. Watch for distracting objects near the edges and for a horizon that cuts through the top of a subject.
Wildlife and pets
Place the animal’s eye or head near an intersection and leave room in front of its gaze or movement. The body can stretch along a gridline, fill the lower portion of the frame, or extend beyond the frame. You do not need to fit the entire animal neatly inside one third.
In fast-moving wildlife situations, focus, shutter speed, light, timing, and behavior may matter more than exact placement. It is better to capture a decisive expression or action with imperfect grid alignment than to miss it while composing mechanically.
Street photography and action
The grid can quickly suggest where to reserve space for a person entering the frame, a cyclist moving through a scene, or a subject looking toward an event. It can also help relate a person to a sign, doorway, shadow, or architectural line.
For action, treat the overlay as a prompt rather than a rule. Timing and gesture often carry more meaning than whether the subject lands on an exact third.
Video and social content
The same idea works in video: position a speaker, performer, or moving subject off-center when the surrounding space contributes to the story. Leave room for a subject to look or move into, and use the grid to check horizons and verticals between shots.
Quick wins for a faster PC:
Repair Windows errors before they cause bigger problemsFix Now →Fix the driver behind crashes, sound loss and screen glitchesFind Drivers →Clear out junk files and repair common Windows errorsFree Scan →On supported Apple devices, Final Cut Camera includes a viewfinder grid overlay. Other camera and video apps may offer similar tools. The exact menu name and availability depend on the device and app version.
How to turn on a composition grid
iPhone Camera
- Open Settings.
- Choose Camera.
- Turn on Grid.
- Turn on Level if you also want help keeping the frame straight.
These settings provide a guide while you compose; they do not alter the photograph by printing lines into the file.
Final Cut Camera
In the camera screen, open Settings, choose Tools, and enable Grid Overlay, where that option is available. Use it as a framing reference while recording.
Dedicated cameras
Search the camera’s display or Live View menu for Grid Display, Framing Grid, Viewfinder Display, or similar wording. Some cameras allow different grid styles or overlay colors. The lines are normally visible only in the viewfinder or rear screen, not in the final image.
Recommended Free Tools
Editing and cropping
You can apply the rule after capture. Most serious photo editors provide a crop overlay that divides the frame into thirds. During cropping, move the image until an eye, horizon, or other important feature has a deliberate relationship with a line or intersection.
Tools such as Lightroom or Photoshop can help you explore these crop variations, but cropping cannot recover detail or context that was never captured. Leave enough resolution and edge space when shooting if you expect to reframe later.
When you should break the rule
A photograph is not improved merely by moving its subject away from the center. Break the guideline when another compositional goal is stronger.
- Symmetry or reflection: A centered horizon, face, doorway, or structure can emphasize mirror-like balance.
- A commanding subject: A powerful face, object, symbol, or direct gaze may need the visual authority of the center.
- Strong geometry: Tunnels, roads, corridors, façades, and converging lines may be most effective when aligned centrally or along a strong axis.
- Frame-filling detail: A close-up that deliberately extends beyond the edges may be more intimate or graphic than one reduced to a third.
- Intentional minimalism: A tiny subject in a large, quiet scene can communicate isolation or scale. Centering it may make that feeling more direct.
- Narrative tension: A subject facing out of the frame or pressed toward an edge can suggest urgency, conflict, confinement, or departure.
- Visual hierarchy: Lines, light, color, pattern, or gesture may lead the eye more strongly than the thirds grid.
Adobe discusses centered portraits, frame-filling compositions, and small centered subjects as valid departures when they better serve the image. Nikon also treats centered composition as a legitimate choice when it is intentional.
The rule is a useful heuristic—not a guarantee of beauty
The rule of thirds is widespread because it is easy to remember and quick to apply. That does not make it a universal formula for attractive photographs.
A 2014 study found weak or absent relationships between conformity to the rule of thirds and aesthetic ratings in the images it analyzed. A 2023 SIGGRAPH Asia study of simple, single-object compositions reported that participants preferred centered objects over rule-of-thirds placement. An exploratory journalism study, in a different experimental setting, reported that rule-of-thirds structure could guide attention and improve recognition of a main subject or message.
These results are not necessarily contradictory. A viewer’s preference can depend on the subject, amount of negative space, symmetry, task, audience, framing, and whether the image is meant to communicate information or evoke a feeling. The safe conclusion is practical: use the grid to generate and compare options, not to predict automatically which image everyone will prefer.
Independent reader supportYour contribution helps us test, update, and keep practical guides available for everyone.A practice exercise that teaches more than memorizing the grid
Choose a stationary subject against a simple background. A plant, mug, person, parked bicycle, or tree will work.
Best Value

- Comprehensive Guide for Nikon, Canon, and Sony DSLRs:This 30-page photography guide is specifically designed for DSLR camera owners, offering essential tips and 16 double-sided, color-coded cheat sheets. Perfect for any camera model, it simplifies complex concepts and helps you master manual mode, whether shooting portraits, landscapes, or action
- Easy-to-Use Reference for Every Shooting Situation:Covering exposure, shooting modes, composition, and lighting, this quick reference guide makes photography accessible for all skill levels. Whether you're photographing fireworks, sunrises, or family portraits, you'll have all the information you need at your fingertips
- Compact and Portable Design – Ideal for On-the-Go Use:Measuring just 4×3 inches, this durable cheat sheet fits easily in your pocket or clips to your camera bag. Its compact size and sturdy design ensure it’s always ready when you need it, making it a perfect photography accessories gift for photographers of all levels
- Perfect for Beginners and Advanced Photographers Alike:From mastering basic settings to capturing stunning shots in challenging conditions, this cheat sheet helps you navigate any shooting situation with confidence. Whether you're new to manual mode or looking to refine your skills, this cards is your ultimate photography companion
- Perfect Photography Companion for Every Mom:These photography cheat sheets are designed to be both durable and practical, featuring a sturdy metal carabiner and a handy ring for easy portability. Packed with helpful descriptions, charts, and color-coded borders for quick reference, they empower moms to confidently master manual mode on their cameras,Perfect Photography Gifts for Women
- Make one centered composition.
- Make a second version with the subject near the left-side intersections.
- Make a third version with the subject near the right-side intersections.
- Repeat the three versions with the subject looking or moving in different directions, if possible.
- For a landscape, photograph the horizon near the upper third, lower third, and center.
- Review the images side by side rather than trusting memory.
For each version, ask:
- Where does my eye go first?
- Does the subject have enough space to look or move into?
- Is the empty area supporting the subject or distracting from it?
- Does the horizon give the sky or foreground the right amount of importance?
- Does the composition communicate balance, energy, isolation, calm, or tension?
- Would a centered frame tell the story more clearly?
A phone’s built-in grid is enough for this exercise. If you want identical framing for repeated self-portraits or timed shots, a smartphone tripod can make the comparison easier, but it is an optional convenience, not a requirement for learning composition.
If you want structured practice beyond these comparisons, an optional photography composition book can provide additional exercises and examples. No special camera or accessory is necessary to start.
A quick field checklist
- What is the actual subject?
- Can its most important point sit near an intersection?
- If it looks or moves, is there room in that direction?
- Should the horizon be high, low, or deliberately centered?
- Does the negative space support the subject?
- Are the horizon and important verticals straight?
- Is there a distracting bright object near an edge?
- Would symmetry, geometry, scale, or emotion be stronger with a centered composition?
- Can you make one alternative before leaving the scene?
Where the phrase came from
The expression “rule of thirds” is commonly traced to John Thomas Smith’s 1797 book Remarks on Rural Scenery, where it described proportions in landscape painting. The broader practice of balancing areas and visual weights is older than the phrase, so this history should not be read as evidence that photography must follow a fixed mathematical law.
Frequently Asked Questions
Do subjects have to sit exactly on a rule-of-thirds intersection?
No. The intersections are approximate target areas. Place the important detail near an intersection or along a line, then judge whether the surrounding space supports the subject.
Windows Errors? Fix Them Before They Spread
Repair common Windows errors and clear accumulated junk for a smoother, more stable PC - no reinstall needed.Free scan · no reinstallOutdated Drivers Are Slowing You Down
One free scan finds every outdated or missing driver and matches the right update for your exact hardware.Free scan · exact hardware matchIs the rule of thirds better than centering a subject?
Neither is automatically better. Off-center placement can create room for a gaze, movement, or environmental context. Centering can be stronger for symmetry, reflections, commanding portraits, geometry, or deliberate isolation.
Does turning on a camera grid change the final photograph?
No. The grid is an on-screen composition guide. It normally does not appear in the captured image.
Can I apply the rule of thirds while editing?
Yes. Crop tools commonly offer a nine-section overlay. Cropping can improve placement, but it cannot restore detail or context outside the original frame.
What should I place at an intersection in a portrait?
Usually the nearer eye or another important facial feature. Expression, eye contact, gesture, lighting, and the direction of the subject’s gaze remain more important than exact grid placement.
Do these 3 things before closing this tab:
1Fix the driver behind crashes, sound loss and screen glitches2Repair Windows errors before they cause bigger problems3Scan for outdated or missing drivers - takes under a minuteThe Bottom Line
Use the rule of thirds to stop composing by accident. Place the subject, horizon, and negative space deliberately, compare an off-center version with a centered one, and keep the frame level. Once you can explain why a composition works, you can follow the grid—or break it—with confidence.
Quick Recap





