Crashes, No Sound, or Screen Glitches?
The Tool Desk
Outbyte Driver Updater FREEFix the driver behind crashes, sound loss and screen glitchesFind Drivers →Outbyte PC Repair FREEClear out junk files and repair common Windows errorsFree Scan →Random freezes, missing sound and display glitches usually trace back to one bad driver. Find and replace yours safely.
Find the Right Drivers →Free scan · under a minute
ThatPainter is reader-supported. When you buy through links on our site, we may earn an affiliate commission. Learn More
This quilt-as-you-go placemat pattern is a small, practical introduction to QAYG. The approximately 18 × 12-inch project starts with backing and thin batting, then adds nine fabric strips one at a time while quilting through all three layers. After trimming, edge-basting, and binding, you have a useful placemat without managing a full-size quilt on a domestic machine.
Outdated Drivers Are Slowing You Down
One free scan finds every outdated or missing driver and matches the right update for your exact hardware.Free scan · exact hardware matchWindows Errors? Fix Them Before They Spread
Repair common Windows errors and clear accumulated junk for a smoother, more stable PC - no reinstall needed.Free scan · no reinstall#1 Best Overall

- Ultra Sharp Fabric Scissors: Wteehn sewing scissors for fabric cutting is made of high-quality galvanized manganese, exquisite hand-forged craftsmanship, high hardness, sharp, durable, rust-proof and not easy to deform, and can cleanly cut thick materials such as multi-layer fabrics and leather
- Professional Fabric Sewing Scissors: Our tailor scissors are designed for fabric cutting and sewing tasks, and the adjustable bolt lock ensures precise cutting. The blade angle is 45°, scientific and labor-saving, this professional fabric scissors can achieve smooth and accurate cutting
- Ergonomic Design: The aluminum alloy handle wrapped with plastic on the outside is ergonomically designed, comfortable to hold and non-slip, which can reduce hand fatigue after long-term use. The upgraded ear protection design fits the hand muscles, making cutting easy and accurate. There will be no friction or pinching
- Multifunctional Fabric Scissors. This 8" sharp sewing shears is suitable for cutting a variety of materials, including cotton, linen, canvas, leather, non-woven fabrics, etc., to meet your various craft needs and provide work efficiency. The chamfering process on the head of the heavy duty sewing scissors can avoid accidental scratches on the fabric
- Widely Applicable: Whether it is sewing, handicrafts, or home repairs, this sharp sewing shears can provide you with stable cutting performance and help you complete a variety of complex and delicate cutting tasks. It is suitable for sewing, tailoring, quilting, clothing, cutting patterns, alterations, art projects, etc
Yes—this is a manageable way to learn quilt-as-you-go (QAYG): the placemat is quilted as you build it, rather than piecing a complete top and quilting the whole project afterward. This strip-piecing version finishes at approximately 18 × 12 inches. You begin with the backing and thin batting, then sew nine fabric strips through the existing layers one at a time before trimming, basting, and binding the result.
The instructions below follow the strip-based project documented by AllPeopleQuilt. QAYG is a broad family of techniques, however. Some patterns use individually quilted blocks, cover strips, raw-edge joins, or specialty batting, so dimensions and construction steps are not interchangeable between patterns.
What you need
Fabric and batting
- Backing: one 18 × 21-inch fat quarter
- Quilt top: nine assorted 21⁄2 × 14-inch fabric strips
- Binding: enough fabric for two 21⁄2 × 42-inch binding strips
- Batting: one 14 × 20-inch piece of thin or low-loft quilt batting
- Optional: quilt-basting spray
- Optional: a water-soluble fabric marking pen
The measurements above apply to this particular approximately 18 × 12-inch placemat. They are not universal QAYG quantities. If you change the finished size, recalculate the backing and batting so both extend beyond the intended top while you sew and trim.
Tools
- Sewing machine with a full bobbin and suitable thread
- Iron and ironing surface
- Rotary cutter, quilting ruler, and self-healing cutting mat
- Fabric scissors
- Seam ripper
- Clips or pins for binding, if desired
- A walking foot or even-feed foot, if compatible with your machine
A walking foot is helpful but not mandatory. It can move the fabric, batting, and backing more evenly and help reduce puckers. Check that any walking foot fits your specific sewing-machine model before buying one. For occasional quilting, a standard presser foot can work if you handle the layers carefully and keep the project flat.
How the quilt-as-you-go placemat works
In a conventional quilt, you usually piece the fabric top first, layer it with batting and backing, and quilt through the finished sandwich later. In this QAYG method, the sandwich is made first. Each new strip is sewn through the top fabric, batting, and backing along its seam, so the section is quilted as it is added.
That makes a small placemat a useful practice project: the layers are easier to control than a full-size quilt, and you get to practice accurate seams, pressing, trimming, machine basting, and binding in one finishable item.
Step-by-step strip-piecing instructions
1. Cut and prepare the layers
Cut the backing to 14 × 20 inches and cut a matching 14 × 20-inch piece of thin batting. The backing and batting are initially smaller than the 18 × 21-inch backing-fabric cut because the strip unit will be trimmed and squared later according to the documented method.
Lay the backing wrong side up and place the batting on top. Smooth the layers so they lie flat without stretching either fabric. If you use basting spray, apply it according to its label and use only enough to temporarily stabilize the sandwich. Basting spray is optional; it is not a substitute for keeping the layers aligned while sewing.
Quick wins for a faster PC:
Fix the driver behind crashes, sound loss and screen glitchesFind Drivers →Repair Windows errors before they cause bigger problemsFix Now →Scan for outdated or missing drivers - takes under a minuteDriver Scan →Rank #2

- RAZOREDGE FABRIC SCISSORS: Ultra-sharp, premium-grade stainless steel blades with a precisely honed edge for clean cuts to the tip
- SMOOTHEST CUTTING ACTION: Advanced pivot design delivers exceptionally smooth performance through fabric
- ERGONOMIC CONTROL: Thumb and finger loops with ergonomic sculpting match hand shape and natural movement
- SOFTGRIP TOUCHPOINTS: Added comfort and control for steady, accurate cutting
- PROTECTIVE SHEATH INCLUDED: Keeps blades safe and protected; 8", White/Orange
2. Mark the first-strip position
Use a water-soluble marking pen to draw a line 21⁄2 inches from one short edge of the layered unit. This line identifies the placement area for the first strip.
3. Place the first strip
Put the first 21⁄2 × 14-inch strip right side up between the short edge and the marked line. Align its long edges with the unit as accurately as possible.
4. Add the second strip
Place the next 21⁄2 × 14-inch strip right side down on top of the first strip, matching the adjacent long edges. Sew along that shared edge, stitching through all three layers: the new strip, the first strip, the batting, and the backing.
Use the seam allowance specified by the pattern or your chosen standard patchwork seam. The important point is consistency: a changing seam allowance will alter the visible strip widths and may leave insufficient fabric for the final trim.
What’s actually slowing this PC down?
Pick the symptom - the matching free tool is one click away.
5. Open, press, and continue
Open the new strip and finger-press it away from the seam. Continue adding strips in the same sequence:
- Place the next strip right side down against the unsewn adjacent edge.
- Sew through the fabric, batting, and backing along that edge.
- Open the strip and finger-press it flat.
- Check that the strip covers the area it is meant to cover before adding the next one.
Repeat until all nine strips have been sewn. Keep the strip unit supported by the table rather than allowing the weight of the project to pull against the needle. If the layers begin to ripple, stop and smooth them before continuing.
6. Press and square the unit
Once the nine strips are in place, press the unit flat. A careful pressing step makes the next operation more accurate and helps reveal uneven edges, folds, or areas where the backing has shifted.
Center the strip arrangement, then trim the top to an 18 × 12-inch rectangle. Use a quilting ruler and cutting mat, and make several light, controlled cuts rather than forcing the rotary cutter through a difficult angle.
Do these 3 things before closing this tab:
1Scan for outdated or missing drivers - takes under a minute2Repair Windows errors before they cause bigger problems3Fix the driver behind crashes, sound loss and screen glitchesRank #3
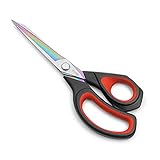
- Durable Strong Stainless Steel Rust Resistant Blades: Forging press manufacturing process enables high-density steel that makes 3 times harder than normal stainless steel and are smoother cutting.
- Ultra Sharp Scissors All Purpose: Easy for cutting more than 16 layers of fabrics. Ideal for sewing, tailoring, quilting, dressmaking, cutting patterns, alterations, hand craft, home and office use etc.
- Multi-color Titanium coating blades. They are strongly resistant to rusting and to adhensives such as glue and tape, making them ideal for almost any kinds of tasks.
- Comfort Grip Handle: Ergonomic design for precision control and max comfort.
- Every Product is independently tested and selected to ensure the performance you expect. The result is a quality item backed by our commitment to your satisfaction.
Accurate squaring matters because the trim establishes the final shape. It also gives the binding a cleaner edge to follow. Before cutting, confirm that the planned rectangle is fully covered by the pieced area and that you are not trimming away a section that has not been securely sewn.
7. Machine-baste the perimeter
Machine-baste around the outer edge of the trimmed placemat. This stabilizes the perimeter and helps keep the top, batting, and backing together while you apply the binding. Inspect the edge afterward for loose threads or places where the layers have separated.
8. Finish with binding
Prepare the two 21⁄2 × 42-inch binding strips and attach the binding around the placemat using the finishing method you prefer or the method specified by your pattern. Work slowly around the corners so the binding lies flat and the corners remain square. Secure the final binding edge neatly on the back.
If you are new to binding, clips can make it easier to hold the folded strip in place without distorting the edge. A seam ripper is useful if a corner develops a tuck or the binding finishes with uneven tension.
Choosing fabrics and changing the design
Nine contrasting strips make the construction easy to see, but the arrangement can be as coordinated or scrappy as you like. Quilting cotton is a practical choice because it is stable, widely available, and easy to press. You can use:
- nine different colors for a high-contrast layout;
- several strips from one coordinated collection;
- scraps cut to the required length and width;
- a light-to-dark arrangement for a gradual-value effect; or
- alternating prints and solids for clearer strip definition.
You can also adapt the number, width, orientation, or color order of the strips. Treat any altered dimensions as your own adaptation, not as the measurements for the original pattern. Changing strip width changes the number of strips required and may change the finished proportions.
Batting and heat safety
For an ordinary decorative or dining placemat, regular thin quilt batting is appropriate. A normal placemat should not automatically be treated as a hot pad or trivet.
Do not use this project as a pot holder, trivet, or heat-protection product unless the batting and complete construction have been specifically rated and tested for that purpose. This pattern has not been performance-tested for direct contact with hot cookware. Keep hot pans and baking dishes on a properly rated heat-resistant item instead.
Recommended Free Tools
Rank #4

- Tailor Scissors made form high-density Stainless Steel Rust Resistant
- Fabric Scissors great for cutting fabrics, sewing, tailoring, quilting, dressmaking, cutting patterns, alterations, hand craft, and everyday home and office use
- Ergonomic soft-grip handle design for precision control and maximum comfort
- Premium Rust and Adhesive resistant, Stainless Steel Blade For Sharp Cutting Edge With Life-Time Warranty
- Designed For Right-Hand And Left-Hand Use
Fixing common problems
The layers are puckering
Stop sewing and check that the backing and batting are smooth beneath the machine. Reduce drag by supporting the project on the table, avoid pulling it through the needle, and consider a compatible walking foot. A walking foot can help the layers feed at a more consistent rate, but it cannot correct stretched fabric or a poorly aligned starting sandwich.
The strips are not covering the batting
Before sewing the next strip, open the previous one and check its coverage. If a strip has shifted, unpick the seam while the correction is still easy. Consistent cutting and seam allowances are more reliable than trying to stretch a strip into position.
The finished rectangle is not square
Press the unit again, identify the straightest usable reference edges, and trim carefully to the specified 18 × 12-inch rectangle. If there is not enough pieced fabric to reach that size, do not force the trim; the unit may have been cut differently, sewn with a larger seam allowance, or shifted during construction.
The binding has ripples at the corners
Check that the placemat edge was trimmed straight and that the binding was not stretched while being attached. Remove and resew the affected section if necessary. A flat, accurately squared edge makes binding substantially easier.
Size options and other patterns
Placemat sizes vary. Approximately 12 × 18 inches and 14 × 20 inches are also common broad dimensions, but the backing and batting must be adjusted for the finished size and for the construction method. Another published QAYG PDF describes a finished 13 × 18-inch placemat and instructs makers to cut the backing and batting larger than the top. Follow the dimensions supplied with the specific pattern you choose.
For readers who want a different format, the following are alternatives rather than interchangeable versions of this tutorial:
- Free strip tutorial: The AllPeopleQuilt project gives the nine-strip construction, the 14 × 20-inch starting batting and backing, the 18 × 12-inch trim, and the binding instructions used here.
- Charm-square option: GE Designs’ Friday Fiesta Place Mats Pattern 179 is a QAYG pattern written for four 13 × 18-inch placemats using charm squares.
- Six-placemat option: June Tailor’s Venice placemat pattern is described by a sewing retailer as a QAYG pattern for six 17 × 14-inch placemats.
- Broader instruction: GE Designs’ Learn to Quilt As You Go includes placemat projects along with explanations of layering, quilting, joining, and finishing.
- Block-based approach: Jera Brandvig’s Quilt As-You-Go Made Modern describes a different method in which fabric is pieced onto small batting blocks and the blocks are joined later.
Check the current edition, dimensions, included instructions, materials, and licensing terms before purchasing any paid pattern or book. Products and availability can change.
Care and laundering
Care for the finished placemat according to the fiber content, batting instructions, and fabric manufacturer’s recommendations. Before the first wash, secure loose threads and confirm that the binding is firmly attached. Washing can change the texture, size, and amount of quilting definition, so do not promise an identical result after laundering. When in doubt, test the care method on a small sample made from the same materials.
Best Value

- ARTS AND CRAFTS STAPLE: All Purpose Fiskars Scissors for cutting a wide variety of fabric and crafts, including wrapping paper, paper, fabric, and more
- PRECISION ART SUPPLIES: High-grade, precision-ground stainless steel blades offer a sharp edge that cuts all the way to the tip
- LONG LASTING AND RELIABLE: A dependable addition to your quilting supplies and scrapbook supplies; Fiskars craft supplies and materials are built to last
- COMFORTABLE AND CONVENIENT: Legendary orange handle is lightweight and ergonomically sculpted for comfort and control; Bent handle design keeps materials flat for mistake-free cutting
- QUALITY TOOLS FOR ARTS AND CRAFTS: From scissors and cutting mats, rotary and paper cutters, to classroom essentials, scissors for kids, and quilting and scrapbooking supplies; Essential for holiday gift wrapping supplies
Supply-shopping shortcuts
The central purchase is a quilt as you go placemat pattern if you prefer a tested layout or a different finished size. For this specific free strip project, the pattern instructions and your own fabric are the starting point; tools and consumables are optional additions rather than substitutes for the construction steps.
Useful supporting supplies include thin quilt batting, quilting cotton or precut strips, a rotary cutter, self-healing cutting mat, quilting ruler, water-soluble marker, optional basting spray, binding clips, quilting thread, and a compatible walking foot for quilting. Compare the machine-foot attachment and the batting’s care instructions before purchasing. Ordinary placemat batting should not be advertised as heat-resistant without specific evidence.
For a broader introduction, a quilt as you go book may be a better choice than a single pattern, particularly if you want to learn block-based joining and other finishing approaches after making the placemat.
Frequently Asked Questions
What does quilt-as-you-go mean?
Quilt-as-you-go means quilting sections while piecing them, rather than assembling a complete quilt top and quilting it afterward. In this strip-based placemat method, each new fabric strip is sewn through the existing top, batting, and backing.
What size is this QAYG placemat?
The documented version finishes at approximately 18 × 12 inches. Other QAYG placemat patterns use different sizes, so check the dimensions for the specific pattern you are making.
Do I need a walking foot for quilt-as-you-go placemats?
No. A walking foot can help feed the fabric, batting, and backing more evenly and may reduce puckers, but it is not mandatory. Confirm compatibility with your sewing machine before purchasing one.
Can I use this placemat as a trivet?
Regular thin quilt batting is suitable for an ordinary dining or decorative placemat. Do not use an ordinary placemat as a pot holder or trivet unless the complete materials and construction have been specifically rated and tested for heat protection.
Can I change the size or number of strips?
Yes, but recalculate the fabric, batting, and backing for the new finished size. Changing strip width, strip count, or orientation is an adaptation and will not necessarily follow the original 18 × 12-inch measurements.
Free tools Windows power users keep installed
One-click scans. No signup required.
The Bottom Line
Bottom line: This nine-strip QAYG method produces an approximately 18 × 12-inch placemat by sewing each strip through the top, thin batting, and backing as you go. Keep the layers flat, use a walking foot only if compatible and helpful, trim carefully, and treat the finished item as a regular placemat—not a trivet or pot holder—unless it has been specifically tested and rated for heat protection.
Quick Recap

Product prices and availability are accurate as of the date/time indicated and are subject to change. Any price and availability information displayed on Amazon at the time of purchase will apply.




