Free tools Windows power users keep installed
One-click scans. No signup required.
ThatPainter is reader-supported. When you buy through links on our site, we may earn an affiliate commission. Learn More
Yes—you can make a color-transition filament with an ordinary FDM printer. The most accessible method prints two tapered, filament-like spirals in different colors, joins them end to end, and then feeds the short composite strand into the printer. It can produce a gradual-looking color change up the height of a vase or tower, but it is not factory-quality filament: the strand may be undersized, faceted, irregular, and mechanically weak.
This project is specifically for a Z-axis gradient, where the object changes color from bottom to top. It is different from a commercial gradient spool, direct color mixing at a nozzle, layer-by-layer color bands, or angle-dependent dual-color silk filament.
What you are actually making
The DIY process creates a short physical composite strand—not a conventional spool of perfectly round 1.75 mm filament. The documented approach prints two complementary shapes:
#1 Best Overall

- Colorful Variety 4 Pack: Each color weighs 200 g, providing a total of 800 g. Dive into the vibrant world of 3D printing with AMOLEN silk multicolor PLA filament pack, featuring stunning shades. Even small models can display multiple colors
- Silk Dual Color PLA: Experiment with multiple hues without the commitment of larger spools. You can print beautiful multicolors in one PLA filament, perfect for arts, crafts, DIY. Whether you're crafting Easter decorations, designing Halloween costumes, creating Christmas ornaments, or making Valentine’s surprises, this filament delivers stunning results every time
- Precision Printing: Achieve flawless prints with shiny silk dual color PLA filament, engineered for ease of use and exceptional precision. With a product diameter of 1.75 mm and precision tolerance of +/- 0.02 mm, smooth and consistent results
- Smooth and Reliable Printing: Experience smooth printing with AMOLEN silk PLA filament. Good shaping, strong toughness, no bubble, no jamming, no warping, melt well, feed smoothly and constantly without clogging the nozzle or extruder
- After-sales Service: AMOLEN is focused on innovative and better quality 3d printing filaments. Stand behind the quality and performance of our 3D printer filament. Provide professional 3D printing technical guidance and good 24/7 customer service
- A color-A spiral that starts at normal thickness and gradually tapers to a point.
- A color-B spiral that starts at a point and gradually expands to normal thickness.
When the two pieces are joined, the amount of each color changes progressively along the strand. The original demonstration used a faceted, hexagonal cross-section and reported that the finished strand was smaller than the source filament, so it required altered extrusion settings. See the original DIY project and downloadable models for its specific geometry.
Choose the right kind of color effect
| Effect | How it works | Best approach |
|---|---|---|
| Z-axis gradient | Color changes progressively from the bottom to the top of a model. | Printed composite filament, splicer, or mixing nozzle. |
| Layer bands | One color is used for one group of layers and another color for the next. | Pause or filament-change commands in the slicer. |
| XY color regions | Different areas of one layer use different colors. | Dual extrusion or a multi-material system. |
| Color mixing | Two molten filaments blend inside the hot end. | Mixing nozzle or dual-input printer. |
| Physical splice | Solid sections of different compositions are joined before printing. | DIY tapered strand or filament splicer. |
What you need
- An FDM printer with a heated nozzle.
- Two dry, compatible filaments—PLA with PLA is the best first experiment.
- CAD software that can create a tapered spiral or a comparable filament-like solid.
- A slicer capable of exporting G-code.
- A way to concatenate or edit the two G-code files.
- Calipers for measuring the finished strand.
- Dry storage and, ideally, a filament dryer.
- A simple test model or sacrificial filament for tuning.
A direct-drive printer will generally be more forgiving of an irregular strand than a long, restrictive Bowden path, but neither setup is guaranteed to accept it. Filament sensors, narrow guides, sharp spool bends, and tight tubes can all cause trouble.
Use compatible materials
Start with two colors of the same polymer, preferably from the same manufacturer. Match:
- Nominal filament diameter.
- Recommended nozzle-temperature range.
- Melting and flow behavior.
- Shrinkage and interlayer behavior.
- Dryness and general material condition.
PLA/PLA is the sensible starting point. Try PETG/PETG only after successful PLA testing. Do not begin with PLA and TPU, PLA and ABS, or any pair requiring substantially different temperatures. “Both materials print” does not mean they are compatible at a transition: incompatible shrinkage, viscosity, or layer bonding can produce a brittle or distorted joint.
Quick wins for a faster PC:
Repair Windows errors before they cause bigger problemsFix Now →Fix the driver behind crashes, sound loss and screen glitchesFind Drivers →Design the two tapered pieces
The geometry is the key to the transition. A normal cylinder with two colors attached at its ends would create a sharp boundary. Instead, make two aligned, matching spirals.
Color A: full size to point
Create a long, narrow spiral with a cross-section approximating the intended filament. Its first end should have the largest section, and its diameter should decrease gradually until the other end becomes a point.
Color B: point to full size
Duplicate the same overall path and reverse the taper. Begin at a point, then expand gradually to the full section. Keep the axis, pitch, length, cross-section, and alignment consistent with the first piece.
Rank #2

- 【Strong Toughness without Breakage】Compare with other PLA filament, the Creality Ender PLA+ filament enhances the toughness of the filament. It can be repeated bending with less susceptible to breakage, and the firm model is firmer and not easy to damage
- 【High-quality & Easy to Print】No clogging, no bubbling, no knotting, smooth printing! Designed and Manufactured with Clog-Free patent to guarantee a smooth and stable printing experience. The good fluidity enables PLA+ filament bundle to be extruded evenly and smoothly during printing. No clogging to the nozzle, and improving the printing success rate
- 【Dimensional Accuracy & Consistency】The PLA Plus filament, 1 kg spool (2.2lbs) of 1.75mm diameter, Minimum dimensional tolerance ±0.02mm. It has wide compatibility making it suitable for almost 1.75mm FDM 3D printers due to the small diameter error
- 【High Compatibility & Environmental Material】Rainbow Ender PLA+ filament perfectly compatible with Creality 3D printers Ender series, CR series, Fully-Enclosed series and compatible with 99% FDM Printers in the market. Made from environmentally friendly materials, the 3D printers filament does not have odor, pollution and toxic during the printing
- 【Vacuum-sealed with Desiccant】Creality plafilament 1.75mm, preventing moisture absorption, allowing for high-detail resolution for more printing scenarios, such as educational toys, machine parts, home accessories and functional parts etc
The original project used a hexagonal cross-section rather than a factory-round profile. That makes the result especially experimental: it may twist, scrape, or feed differently depending on the printer.
Color A: full diameter to point.
Color B: point to full diameter.
Combined strand: mostly color A, followed by a gradual transition, then mostly color B.
Slice and combine the G-code
- Slice the color-A tapered piece using the material and printer profile you intend to use.
- Slice the inverse color-B piece with matching layer height, nozzle, speed, temperature, retraction, cooling, and wall strategy.
- Identify where the first piece finishes and the filament change must occur.
- Combine the files so color A completes before color B begins in the same coordinate system.
- Insert a pause or filament-change action at the transition.
- Remove duplicate homing, heating, bed-leveling, startup, shutdown, or end commands that could interrupt the second section.
- Preview the combined file in a G-code visualizer before printing.
There is no universal line-number recipe: startup code, pause commands, firmware, and slicer syntax vary. Preserve the printer’s active coordinates and temperature, and make sure the second section begins at the correct position. If the transition can be aligned cleanly to a layer, a slicer’s built-in pause-at-layer or filament-change feature is safer than hand-editing. Printing the two sections as separate jobs is another option only when you can transfer and align the geometry accurately.
Change filament cleanly
At the pause, unload color A and load color B while keeping the temperature within the overlapping range of both materials. Purge until the new color flows cleanly. Do not allow a large curled purge blob to remain attached to the strand, because it can snag in the filament path or become an oversized section.
A temperature change during the swap can create a cold plug, delayed extrusion, a blob, or a damaged transition. Using two materials with similar settings reduces that risk.
Inspect and measure the finished strand
Before putting the custom strand on a spool, inspect it for broken sections, loose strands, sharp ridges, abrupt diameter changes, and a weak or visibly separated transition. Store it in a loose coil; do not force it into tight bends.
Measure several points with calipers. Do not assume it is 1.75 mm. The documented DIY method specifically warns that the custom strand is smaller than the original filament. A printer profile designed for a consistent 1.75 mm feedstock may therefore overestimate the material entering the nozzle.
Rank #3

- Tri-color Design: The silk PLA combines three colors into a single filament, resulting in a unique multicolor effect in the printed object. The vibrant and contrasting colors create a striking visual impact, offering more creativity and aesthetic appeal from different viewing angles.
- Silky Glossy Finish: The silk texture delivers a smooth, glossy surface, giving the model a polished look without the need for post-processing. It's perfect for high-quality displays and decorative projects.
- Clog-free and Low Stringing: This PLA is precisely manufactured to ensure that no clogging occurs during printing, minimizing stringing and ensuring a smooth printing process. It's ideal for long-duration prints and complex models, ensuring consistent high-quality results.
- Tangle-free Winding: The silk PLA is wound in a neat and orderly manner, preventing knots or uneven winding during printing. This ensures smooth feeding of the filament, reducing the risk of print interruptions or errors due to poor winding.
- High Precision and Stability: With a diameter tolerance of less than ±0.02mm, the silk PLA ensures smooth and stable filament flow during printing. It delivers clear details, strong layer adhesion, and a smooth, even surface for excellent print quality.
If the strand is consistently smaller, cautiously adjust the slicer’s nominal filament diameter or flow assumptions and test again. If it is strongly faceted or varies substantially, a single diameter correction cannot fully compensate for its changing cross-sectional area.
Print the gradient
Start with a simple, tall, single-wall vase or tower rather than a structural part.
- Perform a short extrusion test and confirm that the strand reaches the extruder and exits the nozzle.
- Print a small tower slowly enough to observe feeding, clicking, buckling, and under-extrusion.
- Try a vase-mode model to reveal the color transition clearly.
- Only then attempt the final model.
Use a slow-to-moderate speed, minimal retraction, and a short filament path where possible. Keep the strand gently supported so it cannot buckle between the spool and extruder. A larger nozzle may be more tolerant of visible irregularities, but it will also change the appearance and extrusion requirements. Begin with the normal material profile, then tune flow conservatively rather than applying an arbitrary universal percentage.
Troubleshooting
Extruder clicks or slips
The strand may be too thin for the drive gears, too irregular, or too difficult to push. Reduce speed and flow demand, check the measured diameter, remove tight bends, and verify that the nozzle is not partially blocked.
Under-extrusion
Measure the strand again. A smaller cross-section, gaps between printed ridges, moisture, or inconsistent geometry can all reduce delivered material. Dry the source filament, lower the test speed, and tune the filament-diameter or flow setting in small steps.
The strand buckles in the tube
This is especially likely in a long Bowden path. Use a shorter path or direct drive if available, improve the guide, remove sharp bends, and test whether the strand is too flexible or undersized for the tube.
Do these 3 things before closing this tab:
1Scan for outdated or missing drivers - takes under a minute2Repair Windows errors before they cause bigger problems3Fix the driver behind crashes, sound loss and screen glitchesA jam occurs at the heat break
Stop the job, unload the strand, and inspect it for an oversized ridge or broken section. Check nozzle temperature and partial blockage. A printed strand with a nonround profile may simply be unsuitable for that printer’s heat break or filament sensor.
Rank #4

- Toughness PLA Filament: FLASHFORGE premium PLA filaments offer excellent ease of use, optimized printing quality, and minimal shrinkage. These filaments are perfect for your functional solidworks projects as they provide improved toughness and stability during printing.
- Clog-Free & Bubble-Free: Manufactured using clog-resistant methods to guarantee a seamless and steady printing experience with these PLA filaments. Thoroughly dried for 24 hours before packaging and vacuum sealed with desiccant to safeguard the filament from moisture and achieve precise printing.
- Tangle-Free and Easy for Using: Automatic winding with supplementary manual detection, to ensure that the line is tidy and less tangled to avoid possible snagging and line breakage. Additionally, FLASHFORGE PLA 1.75mm filament offers enhanced flowability and is compatible with 99% of FDM 3D printers available on the market.
- High Printing Performance: FLASHFORGE 3D printer filament 1.75mm PLA is designed to meet the needs of highly detailed printing and ensure a consistent color, dimensional accuracy, and no warping, no jamming, or layer delamination issues. It provides the best printing experience for 3D printing enthusiasts.
- After-sales Support: All flashforge 3d printer filaments are provided a two-month warranty and also a 30-day Money-back if you are not satisfied. We provide 24-hour online customer service, if you have any questions regarding product issues please feel free to contact us.
The colors meet as a sharp line
Increase the physical taper length or use more layers over the transition. A short transition produces a more dramatic band. Also remember that two colors may not fully blend in a standard nozzle.
The transition is weak or breaks
The joint may contain voids, a notch, poor fusion, or a diameter discontinuity. Treat the custom filament as decorative until mechanical testing proves otherwise.
The print becomes stringy
Irregular strand geometry and repeated pressure changes can make retraction unreliable. Reduce retraction where practical, slow the print, and inspect the strand for loose ridges that can catch in the feed path.
The Tool Desk
Outbyte PC Repair FREEClear out junk files and repair common Windows errorsFree Scan →Outbyte Driver Updater FREEScan for outdated or missing drivers - takes under a minuteDriver Scan →The gradient finishes too early or too late
The visible result depends on how much filament the model consumes, not just its height. Change the taper length to match the target object, and test with the same wall count, layer height, infill, and print quantity used for the final model.
How smooth will the color change be?
The result can look gradual, but smoothness is not guaranteed. It depends on transition length, layer height, nozzle diameter, color contrast, opacity, print speed, thermal history, and the amount of material mixing in the hot end. A tall, thin-walled vase usually makes the effect easier to see than a dense mechanical part.
Intermediate shades may form where the colors overlap, but a conventional nozzle has largely laminar flow and may not mix the materials completely. Research into designed “digital material” filament found that internal material arrangement, voids, and geometric irregularity affect the result; that research method targets a standard 1.75 mm design but is not a turnkey home version of this printed-strand technique. Read the published digital-material filament research for the engineering details.
Independent reader supportYour contribution helps us test, update, and keep practical guides available for everyone.Other ways to make a gradient
Filament splicer
A Mosaic Palette-style system is more repeatable for long or programmed transitions. Mosaic’s current Gradient Mode guide describes tuning the splice, slicing the model as a single-color print, recording total filament consumption, selecting input filaments, setting minimum and maximum splice lengths, and generating the splice plan. The guide gives an 8 cm minimum splice length and uses a 4:1 ratio as an example; different ratios such as 6:1 or 8:1 produce different transition character. These values apply to that workflow, not automatically to the DIY printed strand.
Best Value
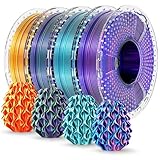
- Dynamic Color Shifts: This dual/tri color silk PLA+ filament delivers a unique visual effect—colors shift as your model rotates, creating prints that look different from every angle. Perfect for eye-catching models, cosplay props, or artistic creations that demand attention.
- Silky Finish with Vivid Shine: With a smooth, satin-like surface and rich, vibrant tones, this silk PLA filament produces a polished look right off the printer—no sanding or finishing required. Ideal for display models and decorative prints.
- Enhanced Toughness & Durability: Made from upgraded PLA Plus (PLA+), this filament offers significantly improved impact resistance and flexibility compared to standard PLA. Prints are less likely to crack or snap, making it a more durable option for functional or intricate parts.
- Tangle-Free, Precision-Wound Spools: Each 250g spool is neatly machine-wound to ensure smooth, consistent feeding without tangles or interruptions. Filament diameter is precisely controlled at 1.75mm with a ±0.02mm tolerance for stable, high-quality prints.
- Small Spools, Big Value: Each set includes four 250g mini spools—perfect for multi-color projects or trying out different combinations without committing to full-size rolls. Vacuum-sealed in reusable storage bags with desiccant to protect against moisture.
For older Palette and Palette+ workflows, Mosaic documents Tools → Generate Custom MSF → Gradient and says the generated MSF defines the lengths to splice. Its documentation also states that a transition tower is unnecessary because transitions occur inside the model. Check the instructions for your exact Palette generation and software version rather than treating either menu path as universal.
Dual extrusion or a mixing nozzle
A printer with two inputs can transition between colors inside the hot end, avoiding fabrication of a separate strand. A demonstrated dual-filament mixing approach shows the general idea. It offers digital control and avoids the homemade strand’s feeding problems, but color prediction, purge waste, nozzle contamination, and differing material viscosities remain issues. Some systems create visible bands rather than a perfectly smooth blend.
Commercial gradient filament
Buying a ready-made spool is the simplest choice when predictable feeding matters. Bambu Lab’s PLA Silk Dual Color/Gradient listing explains that the visible effect varies with filament consumption, infill density, print quantity, and the spool’s starting point. Polymaker’s Panchroma Matte Gradient PLA page describes seamless transitions and notes its former PolyTerra Gradient PLA name. Check the listings for current prices and availability.
Which method should you choose?
| Your priority | Best fit |
|---|---|
| Cheapest one-off experiment with existing equipment | Printed tapered composite filament. |
| Longer, repeatable custom transitions | Filament splicer. |
| Digital control without pre-making a strand | Dual extrusion or a mixing nozzle. |
| Predictable feeding and minimal tuning | Commercial gradient filament. |
The DIY method is worthwhile when the making is part of the project, you need an unusual color pair, or a short Z-axis transition is enough. It is a poor substitute for normal filament production when the print is large, structural, time-sensitive, or dependent on reliable feeding.
Outdated Drivers Are Slowing You Down
One free scan finds every outdated or missing driver and matches the right update for your exact hardware.Free scan · exact hardware matchPC Slower Than It Used to Be?
A free scan shows the junk files, broken settings and background clutter dragging Windows down - then fixes them in one click.Free scan · Windows 10 & 11FAQ
Can I make gradient filament with a regular 3D printer?
Yes. The documented DIY method prints two complementary tapered spirals in different colors and combines them into a short composite strand. It does not produce a conventional, factory-round spool.
Will the homemade strand work in any FDM printer?
No. Its diameter and shape may be irregular or smaller than standard filament. A direct-drive setup may be more forgiving, but sensors, tight guides, Bowden tubes, and extruder gears can still cause feeding problems. Measure and test the strand before a longer print.
Which filaments should I use together?
Start with two dry colors of the same polymer, preferably from the same brand and with similar recommended nozzle temperatures. PLA with PLA is the suggested first experiment; compatibility is not guaranteed just because both materials can be printed.
How do I make the color transition smoother?
Use a longer taper or, with a splicer, adjust its transition-length settings. The result also depends on the target model’s filament consumption, color contrast, layer height, and how much the colors mix in the nozzle. There is no universal transition length.
What’s actually slowing this PC down?
Pick the symptom - the matching free tool is one click away.
Is this method suitable for structural parts?
Not without testing. The printed strand can have weak interfaces, voids, and inconsistent geometry, so treat it as experimental and begin with a decorative object such as a vase or tower.
Quick Recap

Product prices and availability are accurate as of the date/time indicated and are subject to change. Any price and availability information displayed on Amazon at the time of purchase will apply.




