ThatPainter is reader-supported. When you buy through links on our site, we may earn an affiliate commission. Learn More
To press fabric like a pro, lower and lift the iron instead of sliding it, and use only enough heat and pressure for the fabric. Test the actual fabric on a scrap first, follow its care instructions, and press seams as you sew. Let each section cool before moving it so it can hold its shape.
Pressing is a controlled action for shaping or flattening a specific area; ironing generally means moving the iron across fabric to smooth wrinkles. In sewing, pressing is part of construction: it helps set stitches and shape seams without stretching or marking the fabric.
1. Set up pressing equipment before you sew
Keep a stable, padded pressing surface and an iron close to your sewing machine. Pressing each seam during construction is more effective than trying to correct a project after the seams are joined. A folded towel with a clean cover can serve as a temporary surface if you do not have an ironing board.
The Tool Desk
Outbyte Driver Updater FREEFix the driver behind crashes, sound loss and screen glitchesFind Drivers →Outbyte PC Repair FREERepair Windows errors before they cause bigger problemsFix Now →#1 Best Overall

- Lets you see as you press
- Protects from shine, scorch, water spots and pressing marks
- Use with dry iron or steam
- 11" x 28"
- Use only on an iron board or protected work surface. Do not use on heat sensitive surfaces.
- Iron and pressing surface: Use an iron with settings suited to the fabric and a stable, padded surface.
- Press cloth: Keep a clean, suitable cloth nearby to protect fabric and cover fasteners.
- Optional shaping tools: A tailor’s ham can help with curves; a seam roll or sleeve board can help with narrow sections. These are useful for particular tasks, not required for routine seam pressing.
A sewing pressing cloth is a useful optional protective layer. A clean, suitable piece of cloth can serve the same purpose; choose one appropriate for the fabric and pressing method.
2. Prepare the fabric before cutting
Press yardage flat before placing pattern pieces so folds and wrinkles do not interfere with accurate cutting. Follow the project and fabric care instructions when deciding whether and how to preshrink; do not rely on a one-size-fits-all method.
Let the fabric cool and settle on a flat surface before cutting or handling it. Warm fabric can be easier to distort.
3. Test every fabric before pressing the project
Test a scrap of the actual fabric, including its finish if possible. Compare the tested area with unpressed fabric before proceeding. Heat, moisture, and pressure can change the surface, so do not assume that a similar-looking fabric will react the same way.
- Check the fabric or garment care instructions and the iron manual.
- Start with a conservative setting and test on an inconspicuous scrap.
- Test moisture as well as heat if you plan to use steam, a damp press cloth, or a light water spritz.
- Use the wrong side when appropriate and apply only enough pressure to do the task.
- Inspect the scrap after pressing for unwanted changes before working on the visible piece.
4. Choose heat and moisture conservatively
Follow the fabric’s care instructions and the iron maker’s guidance rather than treating a generic chart as a substitute. For a blend, use the setting suitable for its most heat-sensitive fiber. Test moisture too: steam or a damp cloth can help, but may affect some fabrics or finishes.
Rank #2

- Sized at 22" x 30", this sheer silk organza press cloth gives you wide, flexible coverage for garments, appliqué, and precision pressing
- Protects delicate fabrics from shine, scorching, water spots, and unwanted imprint marks during presing
- Allows full steam penetration through its lightweight sheer weave for crisp seams and smooth, professional finishes
- Lets you clearly see darts, pleats, appliqué, and details through the transparent fabric for accurate alignment
- Holds up to everyday use with durable, reusable silk organza that’s machine washable
If a fabric needs moisture but the iron setting is too low to produce steam, a damp press cloth can provide moisture. Test the method on a scrap first and avoid overpressing.
5. Use a press cloth as a protective barrier
A press cloth can help protect fabric from sheen, scorching, or melting, especially when pressing on the right side or when moisture is needed at a lower setting. It can also cover zippers, hooks, eyes, and other fasteners so they do not damage the fabric or iron’s soleplate. Follow any specific instructions for the fabric or garment.
A lightweight cloth may help you see the area underneath, but it still needs to be suitable for the material and method. Test first rather than assuming a particular cloth works for every fabric.
The Tool Desk
Outbyte Driver Updater FREEFix the driver behind crashes, sound loss and screen glitchesFind Drivers →Outbyte PC Repair FREEClear out junk files and repair common Windows errorsFree Scan →6. Press seams in the correct sequence
Press seams and darts as construction proceeds, before later seams cross them. Smooth the stitching first, then press the seam allowance open or in the direction required by the pattern.
- Set the stitching: Lower the iron onto the stitched seam without sliding it.
- Press the allowance: Open it or press it in the pattern’s instructed direction.
- Work carefully around details: Remove pins or work around them, and cover fasteners with a press cloth.
- Let the area cool: Keep it supported and avoid pulling or repositioning it while warm.
If a seam or dart leaves a ridge on the outside, reduce pressure and use the iron tip or edge as appropriate. Remove temporary basting if it could leave marks.
Rank #3

- Easier Ironing: This cotton pressing cloth for ironing is made of comfortable, durable cotton fabric, making ironing easier and more convenient, and improving daily garment care efficiency
- Larger Size for Greater Convenience: This pressing cloth for ironing cotton includes two 19.7x27.5 inch (50x70 cm) ironing cloths, providing wide coverage suitable for home or studio use. Easy to change, enhancing the ironing experience
- Safer Natural Materials: Made from pure cotton fibers, this ironing cloth is breathable and lightweight, evenly distributing heat and absorbing excess moisture to protect clothes from high-temperature damage and maintain their original texture
- Suitable for Various Fabrics: Whether it's cotton, linen, silk, or wool, this press cloth for ironing handles them all with ease, especially suitable for delicate fabrics, making it an ideal tool for garment care and sewing projects
- A Thoughtful and Practical Gift: This ironing cloth to protect clothes is not only a practical household item but also a thoughtful gift for sewing enthusiasts or craft lovers, helping them complete their projects more efficiently
7. Replace the sliding motion with lift-and-place pressing
Lower the iron, use light pressure, lift it, and set it on the next area. Sliding can stretch fabric; excess pressure can leave a ridge or mark. Work with the grain and the direction of stitching, and support the fabric so it does not hang and pull against the area being pressed.
Take particular care with fabric that is bias-cut, loosely woven, warm, or damp. Work in short sections and let each one cool before handling it.
8. Press curves over a tailor’s ham
A tailor’s ham can support curves while you press shaped areas such as darts or curved garment seams. Place the area over the ham and use the same light, lift-and-place motion. It is an optional tool for shaping, not a prerequisite for basic pressing.
A tailor’s ham for sewing may be useful if your projects often include curved or shaped sections.
9. Use a seam roll or narrow surface for small areas
A seam roll or sleeve board can help when pressing narrow sections that are awkward to support on a full-size board. Choose an optional tool for the task you do often; a complete set of specialty tools is not necessary for routine seam pressing.
Rank #4
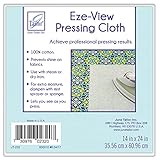
- 100% cotton
- Prevents shine on fabrics
- Use with steam or dry iron
- For extra moisture, dampen with mist sprayer or sponge.
- Allows you to see as you press.
A seam roll for sewing is one option for narrow areas. Use the iron tip carefully where appropriate, and avoid repeatedly pressing an entire bulky area if only the seam allowance needs attention.
10. Take care with textured or delicate fabric
Test the fabric and finish first. When appropriate, press from the wrong side, use a press cloth, and keep pressure light. Avoid sliding the iron or pressing a textured surface directly against a hard surface if that could flatten or mark it.
11. Keep pins and fusible adhesive away from the soleplate
Pressing over pins can mark fabric, and plastic pin heads may melt. Remove pins before pressing or work around them. Cover zippers, hooks, eyes, and other fasteners with a press cloth.
Do not press directly over exposed fusible adhesive. Follow the interfacing manufacturer’s instructions for heat, moisture, pressure, and timing, and test first. If residue gets on the soleplate, follow the iron manufacturer’s cleaning guidance.
Independent reader supportYour contribution helps us test, update, and keep practical guides available for everyone.12. Let every pressed area cool before handling
Leave a pressed area supported until it cools. Handling fabric while it is warm can disturb its shape or stretch it out of position. This is especially important when you have used moisture or are pressing a shaped section.
What’s actually slowing this PC down?
Pick the symptom - the matching free tool is one click away.
Best Value

- All in One Package: this comprehensive package includes 1 mesh cloth about 24 x 16 inches, 1 PTFE fabric about 24 x 16 inches, 1 cotton cloth about 24 x 24 inches, and 1 silk organza cloth about 28 x 28 inches everything you need in one convenient set; Trust these press cloths for ironing to deliver unparalleled garment care, crafting smooth, polished, and protected clothes every time
- PTFE Fabric for High Temperature: PTFE fabric, recommended ironing temperature 400–450 °F; PTFE is a high temperature pro in your ironing cloth arsenal; It excels in handling synthetic fibers, artificial leather, and viscose, thanks to its strong adaptability; Say goodbye to adhesion issues, as this pressing cloth shortens ironing time while providing protection
- Cotton Cloth for Deep Ironing: Cotton fabric, recommended ironing temperature 350–400 °F; the natural purity of cotton makes it an ideal pressing cloth, effectively absorbing excess steam while maintaining the natural texture of fabrics like cotton and linen; This ironing cloth protects clothes by forming a damp buffer, ensuring deep ironing without unwanted shine
- Mesh Cloth for Structural Support: Mesh fabric, recommended ironing temperature 230–320 °F; the elastic structure of the nylon mesh cloth offers excellent physical support to your fabrics, promoting steam circulation for optimal results; Successfully shape and maintain the three dimensional forms of woolen coats, suits, and skirts, balancing wrinkle removal efficiency and shape retention with this ironing cloth to protect clothes
- Silk Organza for Precision Ironing: Silk fabric, recommended ironing temperature 230–270 °F; the transparency of silk organza allows you to observe your ironing work closely; This pressing cloth is nice for delicate lace and tulle, using its microporous design to accelerate steam diffusion; Achieve good smoothed out wrinkles in low temperature environments, preserving the three dimensional beauty of lace and embroidery
A practical press-as-you-sew routine
- Prepare a stable pressing surface, iron, and suitable press cloth.
- Press the yardage flat before cutting, following care instructions for any preshrinking.
- Test heat and moisture on a scrap of the actual fabric.
- Sew a seam or dart, then press it before joining later construction details.
- Smooth the stitching and press the allowance open or in the pattern’s direction.
- Use a press cloth around vulnerable surfaces and fasteners; remove or avoid pins.
- Support the fabric, use a lift-and-place motion, and let it cool before continuing.
What to buy first
A basic iron and stable pressing surface are enough for routine seam pressing. A press cloth is a useful optional protective accessory; specialized shaping tools are for particular tasks.
| Tool | Useful for | Required? |
|---|---|---|
| Press cloth | Protecting fabric and covering fasteners | Optional; a clean, suitable cloth may work |
| Tailor’s ham | Supporting curves and shaped sections | No |
| Seam roll or sleeve board | Supporting narrow sections | No |
Choose tools for the work you do rather than buying a full set of accessories before you need them.
Quick troubleshooting guide
| Problem | Possible cause | What to try |
|---|---|---|
| Seam looks stretched or skewed | The iron was slid across the fabric or the fabric was handled while warm | Use lift-and-place pressing, support the fabric, and let it cool before moving it. |
| Fabric has a sheen, mark, or flattened surface | Heat or pressure was too high for the fabric or finish | Test a lower setting, reduce pressure, and use a press cloth if suitable. |
| A seam or dart ridge shows on the outside | Too much pressure or overpressing | Reduce pressure and use the iron tip or edge as appropriate. |
| Fabric changes after steaming | Moisture reacted with the fabric or finish | Test moisture on a scrap and use a suitable dry method if needed. |
| Pin or fastener leaves a mark | The iron pressed against a pin or uncovered fastener | Remove pins or work around them, and cover fasteners with a press cloth. |
Final checklist
- Did you check the fabric instructions and iron manual?
- Did you test heat and moisture on a scrap of the actual fabric?
- Did you use a lift-and-place motion with light pressure?
- Did you press seams and darts before later construction details crossed them?
- Did you use a press cloth where it could protect fabric or cover fasteners?
- Did you remove pins or work around them?
- Did you let the fabric cool before moving it?
FAQ
What is the difference between pressing and ironing?
Pressing uses a controlled lift-and-place motion to shape or flatten a specific area. Ironing generally involves moving the iron across fabric to smooth wrinkles.
How do I know what temperature to use when pressing fabric?
Follow the fabric care instructions and iron manual, and test a scrap of the actual fabric. For a blend, use the setting suited to its most heat-sensitive fiber.
Outdated Drivers Are Slowing You Down
One free scan finds every outdated or missing driver and matches the right update for your exact hardware.Free scan · exact hardware matchWindows Errors? Fix Them Before They Spread
Repair common Windows errors and clear accumulated junk for a smoother, more stable PC - no reinstall needed.Free scan · no reinstallWhen should I use a press cloth?
Use a suitable press cloth when you want to protect fabric from sheen, scorching, or melting, or to cover a fastener. Test the cloth and method on a scrap first.
Should I press over pins?
No. Pins can mark fabric, and plastic pin heads may melt. Remove pins before pressing or work around them.
Do I need a tailor’s ham or seam roll?
No. They are optional tools for particular tasks: a tailor’s ham can support curves, while a seam roll or sleeve board can help with narrow sections.
The Bottom Line
Test first, follow the fabric and iron instructions, use light pressure, and lift rather than slide the iron. Press seams as you sew, protect the fabric and fasteners when needed, and let each area cool before handling it.
Quick Recap

Product prices and availability are accurate as of the date/time indicated and are subject to change. Any price and availability information displayed on Amazon at the time of purchase will apply.




